Friday, November 28, 2014

A Plate of Many Colors

In the Hub's Youth Garden Program, students will often harvest & cook whole food snacks such as Kale chips or roasted beets, parsnips and sweet potato.

Last Wednesday students from MHC’s youth garden program prepared a meal using some of the sweet potatoes and kale they grew in the garden. As they prepared the food we talked about the differences between whole foods, minimally processed foods and overly processed foods. The students were asked to figure out how many whole foods verses processed foods they used to prepare the meal. The hope was that students would experience a tasty meal and recognize that eating whole foods actually tastes great. We asked the students why they thought it was important to eat more whole foods (real food) and less processed? The students soon began to share answers they had learned from previous weeks, “whole foods have more nutrients in them,” “whole foods give your body energy,”  “our bodies work harder to break down the processed foods,” and last, “processed food will not give you energy that lasts, but whole food will.”

As the students sat down to enjoy the meal they had prepared each student shared the things they were thankful for.  Several students included garden club, the garden and their worm bin to their list of thanksgivings.

The meal was a complete success! Everyone enjoyed all that was prepared with the exception of one student who said he doesn’t like anything that taste like tacos, but he liked everything else. Our meal consisted of Hummus Tacos, Sweet Potato Oven Fries, Kale chips and an Apple Oat Crisp for dessert. 

Terms the students learned:

Whole foods = whole foods are foods in their natural state, or very close to their natural state. The vitamins, minerals and other nutrients remain intact in the food, and they do not typically contain added ingredients. Examples include fresh vegetables and fruits, beans, whole chicken, whole grains (such as oats and brown rice), eggs and milk. 

Minimally processed foods = whole foods which have been changed or added to in order to preserve naturally.
Examples include butter, whole grain bread, plain yogurt, juice, cheese.

Overly processed foods = foods which have been changed a lot from their original form before they are cooked, or foods that have added chemicals or artificial ingredients.
Examples include mosts cereals and breads, crackers, frozen pizza, boxed mac and cheese, fruit snacks, frozen prepared meals, fast foods.

Tuesday, November 25, 2014

Baked Sweet Potatoes with Poached Cranberries

With Thanksgiving just around the corner, we offer this healthy update to a classic holiday sweet potato dish. Sweetened cranberries take the place of the gooey marshmallow preparation. The colors are festive and bright, and the flavors are made for each other. 

Adapted rom Super Foods by Dolores Riccio


One 10-12 ounce package fresh cranberries
1 cup sugar
1 cup water
1 cinnamon stick
2 large sweet potatoes (about 2 pounds)
1 tablespoon cider vinegar
salt to taste


Preheat oven to 375 F. Wash potatoes and stab them in a few spots with a paring knife. Bake them for 30-45 minutes, or until beginning to soften, but still firm enough to slice.

While the potatoes are baking, wash and pick over the cranberries.  Combine the sugar, water, and cinnamon stick in a deep saucepan and bring the mixture to a boil; cook for 3 minutes. Add the cranberries, and cook uncovered at a low boil, stirring often, for about 5 minutes, or until the berries have popped open, but retain their shape. Remove the cinnamon stick and set the poached berries aside to cool slightly (the sauce will thicken). The cranberries can be prepared ahead; if chilled, bring them to room temp. before proceeding.

Once the potatoes are done, remove from the oven and allow to cool slightly. Cut the potatoes into thick, even slices, 4-5 per potato. Remove the peels, which will come off easily at this point. Place them into a serving dish, sprinkle with salt and ladle some of the cranberries on top. Leftover cranberries keep for weeks in the fridge and may also be frozen.

--Kayte

Monday, November 24, 2014

Basic Garden Tool Care

As the garden season for this year winds down at Mother Hubbard's, we begin to think of what we can do to prepare for next year's growing season. Among the many steps we take to overwinter the garden and organize for the new year, caring for our much-used garden tools becomes a priority. This simple process is great for a number of reasons! For one, tools can be expensive, and cleaning and sharpening them extends their life, cutting would-be costs of replacement tools. Additionally, sharp tools are far more efficient in the garden, lessening the time and effort of tasks like digging and mulching.  At Mother Hubbard's, we follow these simple rules to take care of our tools and prep them for the coming garden season:


1. Clean the tool by using a brush or steel wool to remove dirt and other substances. This helps prevent disease spread and keeps tools looking new. If a tool has multiple parts, it should be taken apart before cleaning.

2. Sharpen with a flat file. First, find the beveled edge of the blade of your tool. Stabilize the tool. Then, align the file with the bevel, and move the file along the blade in a single direction, away from your body. Repeat this process until the desired sharpness is acquired.

3. To remove any hanging metal pieces or burrs, place the file flat against the back side of the blade, and sweep the file once across.

4. Lubricate with linseed oil to protect against rust.

5. Reassemble any multipart tools, and you are done!


Good tool care is as simple as that!

Friday, November 14, 2014

Sensational Squash

Butternut, acorn, spaghetti, pumpkin--squash is the vegetable of the season. Our produce carts in the food pantry have been laden with all sorts of winter squash, which is good news for the frugally minded. Winter squash, properly cured, will keep through the winter if stored in a cool, dry spot, and the culinary possibilities are endless! Whether you go cinnamon sweet or sage savory, these autumnal gems offer something for everyone.


Those thick skins and hard bodies can seem intimidating until you realize that you can simply stab them in a few places (to vent steam) and stick them in the oven whole, bake until they are fork tender, then cut them in half and scoop out the soft flesh. From there you can make pumpkin pie (butternut can be used instead of pumpkin in any recipe) seasoned spaghetti squash, creamy butternut soup, and many other incredible creations (check out this vegetarian lasagne with butternut béchamel).

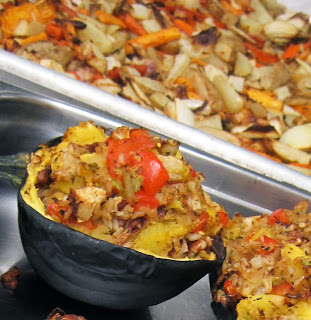
This season I have been especially taken with the simplicity and ease of transforming an adorable acorn squash into a comforting side dish, or a festive holiday entré.

We demonstrated and sampled roasted acorn squash in the pantry a few times, and plenty of folks seemed familiar with the basic butter and brown sugar method. At our Healthy Happy Holidays cooking workshop we assembled acorn squash stuffed with a tasty rice pilaf (perfect for the vegetarians at your holiday table). Find the recipe here, and be sure to enjoy these versatile, nutrient-rich beauties, while they are in season.

Tuesday, November 11, 2014

Garlic in the Garden!


Homegrown garlic can be as beneficial for your garden as it is for your cooking. With antibiotic properties for both humans and your garden, it’s no wonder that the low-maintenance plant is often found in urban gardens.
Three ways garlic can benefit your garden:

Pest Control with Companion Planting: 
Plant garlic around pest attracting plants and trees to help keep a variety of insect and animal pests at bay for the entire growing season. Follow usual garlic growing steps and harvest when the time comes

Soil Detox: 
Plant garlic in a bed that previously had disease-carrying plants, such as tomatoes. The antimicrobial and antifungal properties of the garlic will “clean” the soil by killing off a variety of pathogens.

Garlic “tea” as a low-cost, low-toxicity insecticide: 
  • Chop an entire head of garlic, add it to 4 cups of boiling water, and allow the contents to steep for 24 hours. Strain the boiled contents into a spray bottle.  
  • Test the “tea” on a small portion of the plant – if everything looks ok the next day, spray away! Make sure to cover neighboring plants so that pests do not simply move. The best time to spray is during the cool portion of the day. The spray will only last a few days. 
  • Caution: while the spray kills pests, it also kills the beneficial insects.


How to grow your own garlic:
  1. In the mid-fall, plant garlic bulbs in fertile, weed-free soil. The bed should be in full sun, or as close to full sun as possible.
  2. Each clove (one section of the entire bulb) should be planted root side down, 6-8 inches from all other cloves, and 2 inches down.  *Note: larger cloves typically mean larger yield 
  3. Once spring returns, make sure the plants receive about one inch of water per week. Halt self-watering once the visible leaves begin to yellow.
  4. By mid-June, you will notice that your plants have long, flowery tops that curl and straighten into long, spikey accents. These accents, or garlic scapes, should be cut to increase growth.  *Note: use the tasty scapes as additives to pesto, dips, soups, and other sauces
  5. Fertilize your garlic every two weeks beginning in March; try compost tea and worm castings!
  6. Bulbs are ready to harvest when the leaves turn yellow-brown in June or July. Dig (do not pull!) each bulb out of the bed. Move the bulb out of the sun ASAP.
  7. To cure and preserve garlic, tie or braid the leaves of 6-10 plants together. Hang the bundles in a shady, dry, and possibly drafty area for about 4-6 weeks.
  8. Once curing is complete, cut off stalks about 1-2 inches above the bulb and store the garlic in brown paper or mesh bags.
For a garlic planting demo, join us this week in the Food Pantry from 12:30-4:00pm!

Resources

Thursday, November 6, 2014

Building Soil with Leaves: The Free Garden Builder


We are having lots of fun with leaf piles in the MHC gardens at this time of year!  We are gathering these leaves to use throughout the coming years as mulch, in our compost piles and as a rich soil amendment.


This free amendment has many benefits for the garden.  We collect large leaf piles at each of our gardens each fall. The leaf piles start to break down over the winter and by spring they are ready to use as mulch in our garden beds.  This nice dark mulch helps to warm the soil as it collects the heat of the sunshine. As this mulch breaks down further in the garden beds, it conditions the soil in many ways. The leaf particles improve soil structure and can increase the water holding capacity of soil by up to 50%.  This organic material attracts earthworms and much of the microbiota that make up healthy soil.  Leaf matter also adds twice the mineral content to the soil that manure would provide.

You can also gain these benefits by top-dressing your garden soil with leaf mold.  Leaf mold is the product of a leaf pile that has been sitting and breaking down for a year or two.  We are fortunate enough this year to have piles of leaf mold to top dress our garden beds over the winter, and to use in  potting mixes for our container plants and raised beds.

At home you can use this years' leaves to tuck your garden beds in for the winter. However it is recomended to shred the leaves first, as whole leaves can form a mat over your beds that keeps water and air from your living soil.  You can simply run your lawn mower over your leaves a few times to shred them before adding to your beds.

Another way that leaves add big value to our garden is as a compost ingredient.  We add leaves to our compost piles all year round as our main carbon source, and we end up with gloriously dark and loamy compost.  Leaves are a carbon rich material, and a good recipe for compost is 2/3rds kitchen scraps to 1/3rd leaves.

So don't put those leaves on the curb to be taken away!  Keep them, use them, and your garden will repay you with healthy plants, produce and flowers!