Mother Hubbard’s Cupboard is known to have a fairly
extensive garden program. We grow all sorts of veggies and fruits in an attempt
to show people how simply changes to one’s routine can make running a garden so
easy and simple. Among the varieties of produce that we grow (and use in our
cooking demos and sampling tables), we also grow a large sample of varied
herbs. I know what you may be thinking, “Herbs? Really? Can’t I focus on something
with sustenance like tomatoes, squash, or strawberries and just buy my own?” To
that I say, “buckle your seat belts cause I’m about to learn you a thing or two.
Trust me when I say that an herb garden is a great investment.
As general knowledge when starting an herb garden, know that
most herb prefer well-drained soil and sunny locations. Plants that are
established require the least amount of watering and will continue to be lower maintenance
as they grow. They can grow in individual pots or alongside vegetable plantings
as companions. Moreover, most herbs will flower at some point. Now, in most
cases this means that your herbs will be bitter after harvest so its better to
harvest before this happens. Don’t worry, if you like the flowers, you don’t have
to get rid of all of them, you just have to be consistent with which portions
your harvesting from.
For starters, having and maintaining an herb garden is
incredibly simple as most herbs don’t require tons of upkeep just the
occasional trimming and watering. Plants such as Rosemary, fennel, lemon balm,
oregano, and dill require occasional watering and temperature control while many
herbs require even less. Why is this important to know? Well, herbs that you
find in the store may come from questionable sources. By that I mean that the
the taste or sought after effects of them may not be as prevalent as one would
hope. By growing your own, you can control exactly when you harvest, propagate,
and use your herbs ensuring that you get the most out of them for the least
amount of financial strain.
 |
| Calendula |
Also, this category of plants has so many different uses.
The ways in which herbs can be used range from simple seasoning and tea making
to aromatherapy and healing practices. What other food group can range that
widely? Simply put, other herbs. You may think I’m joking here but really, take
a look: lavender, mint, bay leef can be used as calming agents if boiled down
to make oils for use around the home; mint, lavender, calendula, nasturtium,
and chamomile can all make soothing teas while also adding signature flavors to
foods and desserts; calendula, Echinacea, catnip, and nasturtium all possess
healing properties that can treat flu symptoms and minor skin infections as well
as assist in oral hygiene. This list is by no means extensive as it could go on
and on and on and on. Of course I wish I could talk about all the different
herbs but, alas, I’m going to limit it to a select few that we grow here at The
Hub:
 |
| Peppermint |
Calendula – flowers are
used to sooth the skin, can also be used to season/flavor soups and broths.
 |
| Rosemary |
Mint – makes for some very intense and flavorful teas. The scent
can also assist with memory recollection. More popular in dessert dishes as an
accent. Peppermint is a perennial and require spread maintenance. This means
that peppermint has the potential to be invasive when planted alongside other
species. Because of this, asolitary pot is recommended. Its not all bad though,
with that pot youll have more mint that you know what to do with (maybe you could
share the wealth). Don’t forget to trim!
Rosemary – one of the
more difficult to maintain (which doesn’t say much as its still very simple),
rosemary likes to be warm and requires temperature control and access to
constant airflow in order to flourish. It can enhance savory flavors while
cooking.
 |
| Parsley |
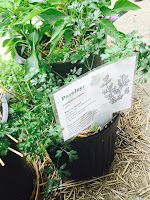
Parsley - biennial that needs to be started from seed. Once done, parsley is very fruitful. Very popular cooking herb. Possesses copious amounts of potassium and can aid in digestion.
Basil – annual herb that
thrives in the summer. Usually used by cooks as a standard in Italian cuisine.
Extremely versatile and can be used as an accent in various flavors of tea.
 |
| Sage |
Sage – easy to maintain
perennial that is best started from seed. Used to season in savory dishes.
Great for oral hygiene as it can remove bacteria in the mouth, soothe gums, and
eliminate bad breath. Also makes for some interesting tea.
Now, I've given you a lot of information and surely you've already gone out and planted a whole garden with Roadrunner like speed because you guys are all extremely fast. But you may have hit a hiccup, how do you harvest and store these wonderful gifts from the earth? Not to fret, we are going to hash that out. As i mentioned before, flowers are pretty but they dont make for the most tasteful herbs samples. So, youll want to harvest before your plants flower, to do this you can literally cut off a small portion of leave and stems from different parts of the plants. These cuttings are good for immediate use. That was easy right? Im glad you think so.
Another way to do this is to take the entire plant or a portion of it down to the root and dry it out. Drying is a very low maintenance way to store your herbs and really hone that specific flavor that you may be looking for. Remember, dried herbs are leagues more potent than fresh. To use this method, take your uprooted sample and place a paper bag over the plant and secure the bag with a rubber band around the bag and stem. Hang around your house (preferably near a window) and give an occasional shake. After a couple of days, your herbs will be thoroughly dried and ready for storage in an airtight container to be used at your leisure.
The second way to store your herbs is by freezing. In this instance, you'll want to use your fresh herbs. Take your cutting into your kitchen and chop them up really fine. Feel free to mix different herbs together in a way that you would be comfortable cooking with and then sprinkle the mix into ice trays full of water then freeze. Each cube will contain a nice amount of flavor that can be easily popped out and added to any dish that you see fit. Doesn't get easier than that.
If you have any questions or
concerns about herbs and all their glory, leave us a comment below. If you’d
like to harvest some herbs for use today stop by The Hub and get some cuttings.
We’re always happy to help jumpstart a garden! And don’t worry we always have
plenty of thyme on our hands… get it? Its because time and thyme. I’m
sorry. Until next time, we'll be harvesting!
