Showing posts with label water bath canning. Show all posts

Tuesday, August 16, 2016

Happy Canning: A Mini Guide to Food Preservation

Just a sample of what can be done with canning
 Preservation by canning is a great way to save food that you have a surplus of and to diversify your meals. It is also a great way to keep eating local, even in winter! Pulling out a jar of bright yellow peaches in the middle of winter? Call me over because that’s amazing. But why stop there? Jam, green beans, corn, salsa, pickles, soups, broths etc. The list goes on, and it could meet potentially everyone’s dietary needs and desires. I don’t know about you, but that sounds pretty great to me.
 
When deciding what to can its important to pay attention to what’s available to you at the time. Take note of what’s on sale and what’s going to get you the best bargain, or what you have growing in your garden. Most importantly though, look at what you think you'll want to eat later. Once you’ve figured that out, you’ll have to 
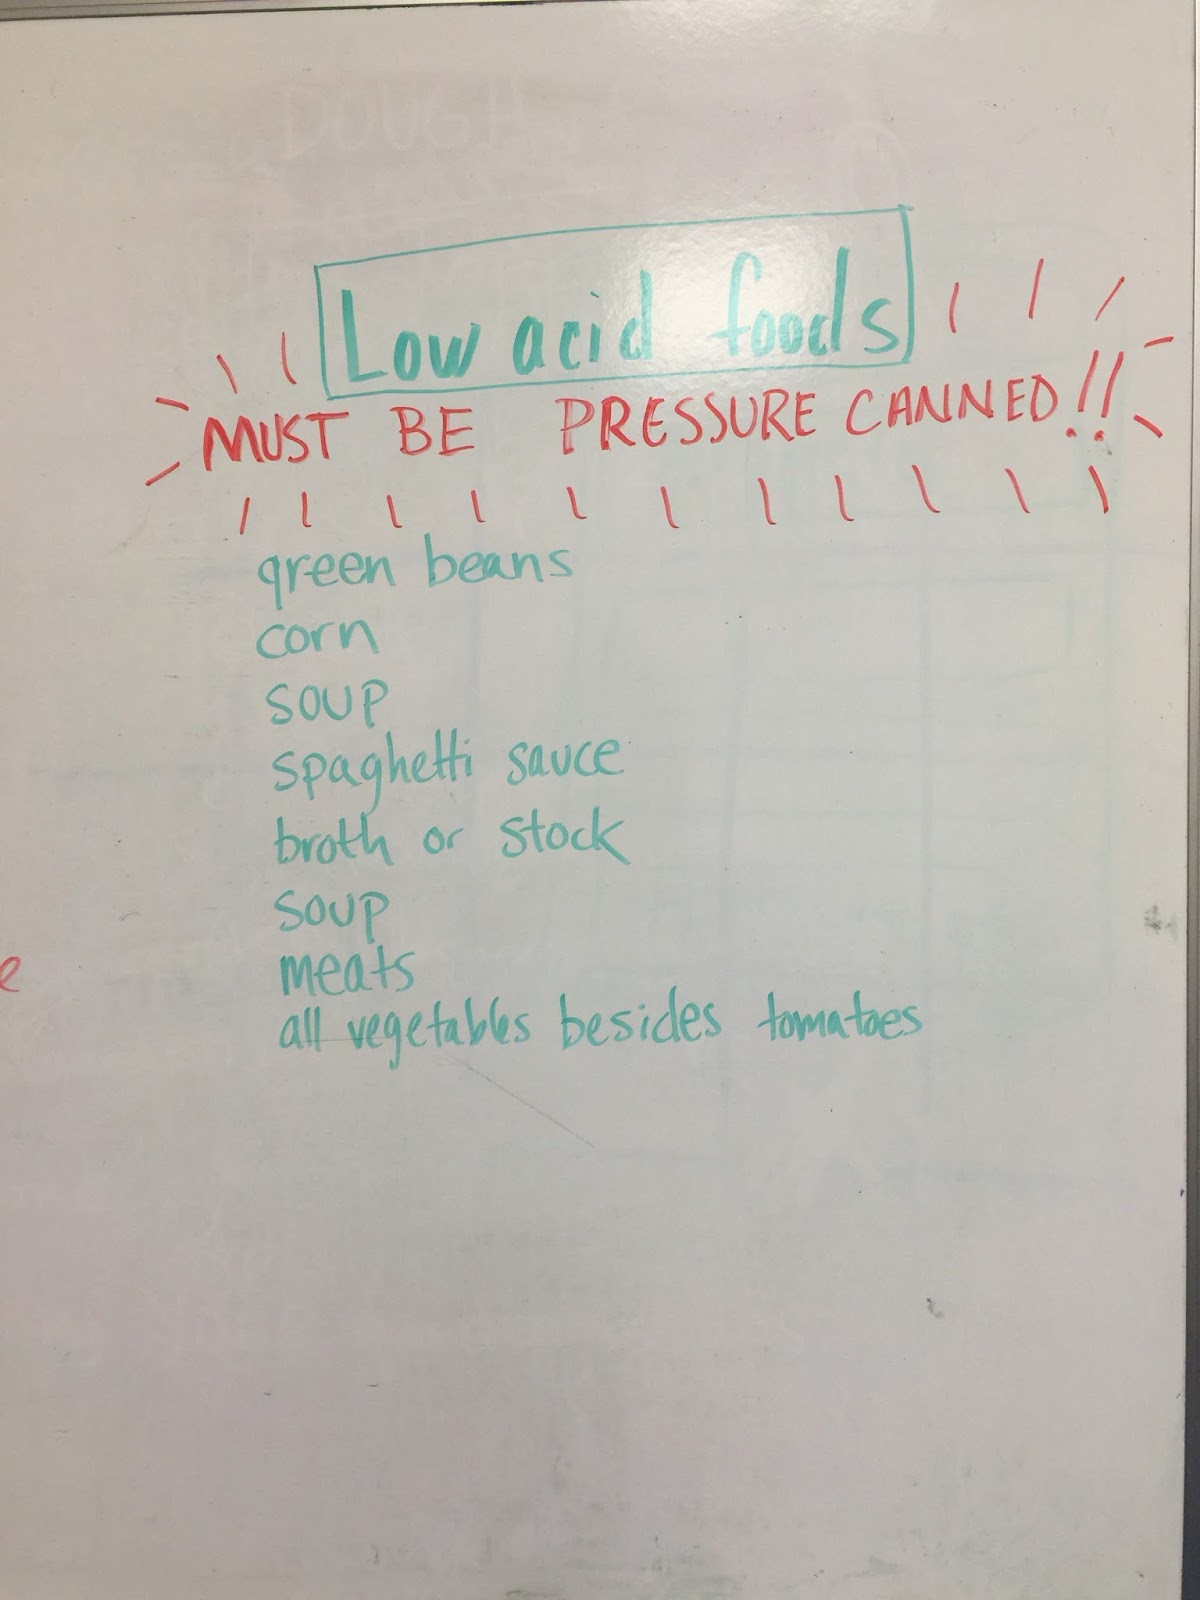
decide which canning method is best for that type of produce.

Now, bear with me here, okay? There’s only two methods of canning: boiling water bath (BWB) canning and pressure canning. The former can be used for all your high acid food needs; luckily, every fruit falls into this category, along with pickles, tomatoes (with added lemon juice) and acidified foods like chutney or ketchup. The latter is used for pasta sauce, soups, broths and veggies. Disclaimer! It is super important to use the proper method for the food your canning. Canning is a perfectly safe method of preservation, but you need to do your research, and follow instructions.

 If you’re new to world of canning, start with BWB because the cost is minimal and its used to preserve fruits and everybody likes fruit.

Next step is to choose a canning recipe from a reputable source and then follow that to the T. I mean it. Don’t try to cut corners to speed up the process. I guarantee you that every step in that recipe is for tasty food that is safe to eat. Nobody likes food poisoning; I can guarantee that. Canning is all about acid levels but you don’t need to know what chemicals do what. Simply follow that recipe and everything will fall into place.


To get started with BWB you'll need some of the following equipment:
  • Mason jars with two part lids. One to cover/seal and the ring to secure. The flat lid part needs to be new.
  • A pot that is at least 3 inches taller than your jars so that they may be submerged in water. And it needs to have a rack to keep the jars off the bottom
  • Canning tongs (DO NOT use kitchen tongs. They are not the same and you will hurt yourself)
  • Wide-mouthed funnel
  • Bubble tool (plastic knife works fine for small jars)
I know that may seem like a lot, but, you can purchase kits that have almost all of these materials for as little as $12. Great, right?

Now that we've covered all those bases, here are some fantastic resources for canning:
So, now you're ready to move forward and can the night away. Leave a comment below and let us know how it goes or if you have any question or concerns or simply share with us a recipe that you found to be a must-have. Until next time, happy canning!


Homemade peach jam


Monday, June 23, 2014

Canning Season is Here

Canning is a great way to take control of the foods we eat. When you process fruits and vegetables yourself, you know where they come from, and what has been added to them. You can avoid excess sugar and unwanted preservatives, and still enjoy safe and tasty home-cooked products. In the winter time it’s satisfying and comforting to go your own kitchen cabinet for beautifully preserved, locally grown, summer foods. The process of canning is also interesting and fun to do with a partner or friend.

We offer three canning workshops at Mother Hubbard's Cupboard each year, and will also offer demonstrations at the Saturday Farmer's Market in July and September. But if you have some produce that needs to be put up, you probably can't wait until our later summer workshops and demos. Here's the basics to get you started, and some links to recipes and methods. 
Canning is a process of preserving food by heating it to destroy unwanted micro-organisms and sealing it into a jar, to keep oxygen out. Some organisms can survive heating to boiling temperature, and an oxygen free environment. However, these organisms cannot survive in a high acid environment. So, to safely can foods using boiling water, you need to create a high acid environment inside the jar. To can products that are not high in acid, you need to heat the contents beyond boiling temperature, using a pressure canner.
The boiling water method is the one to use for canning tomatoes. Boiling water canning is only safe for preserving high-acid foods, such as most fruits, tomatoes (with added lemon juice) or foods with added acid such as pickles, catsup, salsa and chutney. Any time a low acid food is added to the product to be canned (such as onions, cucumbers or peppers) lemon juice or vinegar must be added (and a trusted canning recipe followed) in order to safely can with the boiling water method. Otherwise, you need to use a pressure canner 
It is easy to get started canning. You need a few special items, but most of them are inexpensive or easy to find second-hand. Consider going in on equipment with a neighbor, relative or friend, to reduce the initial investment. (You can also borrow them from our Tool Share program). For step by step instructions, see the Tomato Canning instructions.
You will need:
  • ball jars, designed for canning, these can be used over and over 
  • a canning bath (large enamel pot with a rack inside to hold the jars) or a large stock pot with some sort of rack 
    inserted 
  • flat lids designed for canning jars (these MUST be new. Do not reuse these) 
  • screw-on metal bands to go over the lids (these can be reused, and should be removed once the sealed jar has cooled) 
  • a jar lifter 
  • a canning funnel 
  • a clean small cloth 
  • ladle, spoon, knife and other basic utensils for prepping the food 
    Always be sure to follow trusted canning recipes closely. This is not the place to experiment, especially when it comes to the amount of vinegar or lemon juice required in a recipe. Tweaking spices to your own tastes is fine, just be sure keep the ratio of added acid to product consistent with a recipe designed for boiling water bath canning. Get your hands on a good canning book such as the Ball Blue Book of Preserving, or Putting Food By, and use that as your reference guide. County Extension websites (such as Purdue’s) are also great sources for trustworthy, detailed information on canning all sorts of foods. 
    Our goal is to empower you to get started canning, and to feel confident about preserving food safely at home. It is not difficult, just a bit time consuming. It is so satisfying, and at times even exciting, you may discover a new hobby! 

Thursday, June 20, 2013

How to Can Tomatoes

Home Canned Tomatoes from Fresh Tomatoes (boiling water method)
  • Tomatoes - about 23-25 lbs to make 7 quarts of tomatoes. Of course, you can reduce the size of batches.
  • lemon juice - bottled, about 1/2 cup
  • 1 Water bath Canner (Tomatoes are on the
    border between the high-acid fruits that can be preserved in a boiling-water bath and the low-acid fruits, vegetables and meats that need pressure canning, that’s why we add lemon juice)
  • 1 large pot (to scald the tomatoes)
  • 1 small pot or kettle -for water to sanitize the
    lids.
  • Paring knife, for coring tomatoes
Pint or quart canning jars
Lids - thin, flat, round metal lids with a gum
binder that seals them against the top of the
jar. They may only be used once.
Rings - metal bands that secure the lids to the
jars. They may be reused many times.
Jar grabber (to pick up the hot jars)
Lid lifter (optional) –it has a magnet to pick the
lids out of the boiling water where you sanitize
them.
Jar funnel
Large spoons and ladles Clean damp cloth
Get the jars and lids sanitizing. The dishwasher is fine for the jars; especially if it has a "sanitize" cycle. I start that while I'm preparing everything else, so it's done by the time I'm ready to fill the jars. If you don't have a dishwasher, submerge the jars in a large pot (the canner itself) of water and bring it to a boil. If using a dish washer, be sure to let it go through the rinse cycle to get rid of any soap!
Get the canner heating up. Fill the canner about 1/2 full of water and start it heating (with the lid on). Get a large pot of water heating for blanching the tomatoes for peeling.
Start the water for the lids. When it boils, pour it over the lids and rings. Cover and let sit until you are ready to seal the jars.
Remove the tomato skins. Put the tomatoes, a few at a time, in a large pot of boiling water for no more than 1 minute (30 - 45 seconds is usually enough) Then plunge them into a waiting bowl of ice water. This makes the skins slide right off of the tomatoes! Then you can cut the tomatoes in quarters and remove the tough part around the stem and any bruised or soft parts. Why remove the skins? They become tough when you cook them!
Heat the quartered tomatoes just to boiling, stirring to prevent burning. Before you fill each jar with tomatoes, add 1 Tablespoon of lemon juice to the bottom of each pint jar (2T for a quart. jar). The additional acid makes all types of tomatoes safe for boiling water bath canning, and retains color and flavor.
Fill the jars with heated tomatoes. Leave 1⁄2 inch head-space at the top. Wipe off the rim of the jar with a clean damp cloth, then put the flat part of the lid on, and the ring. Just screw them on snugly, not too tight. Be sure the contact surfaces (top of the jar and underside of the ring) are clean to get a good seal!
Carefully lower the jars into the canner and make sure they are covered with at least 1 inch of water. Bring the water back to boiling. Process the jars in a boiling-water bath for 35 minutes for pints and 40 minutes for quarts. After the processing time has passed, lift the jars out of the water and let them cool without touching or bumping them in a draft-free place (best to leave them overnight). Once the jars are cool, check that they are sealed, verifying that the lid has been sucked down. Just press in the center, gently, with your finger. If it springs up and down (often making a popping sound), it is not sealed. If you put the jar in the refrigerator right away, you can still use it. Some people replace the lid and reprocess the jar, but it is best to heat the contents back up, re-jar them (with a new lid) and process for the full time in the canner. With all the extra heating, and processing, you may loose some quality,
but it will be safe to consume. This document was adapted from the "Complete Guide to Home Canning," Agriculture Information Bulletin No. 539, USDA, revised 1994.