Thursday, June 30, 2016

Gourmet in the Garden


Hello Beautiful!  Who knew you could make such a glorious looking salad with greens harvested mostly from your back yard? Our friend Oliver does! This 7-year-old gourmet garden guru taught our Kid's Cooking class the other day and taught us all a thing or two... or three! 


Just look at that poise! 
Not just delicious, but exceptionally nutritious too, this wild edible salad delights the eyes and taste-buds, and leaves you feeling healthy and fresh!

.....................


Oliver guided us confidently through the salad preparation, teaching appropriate knife skills   (watch those fingers!), and how to safely identify the plants we used.

This vibrant dish included wood sorrel, pink and white clover, dandelion flower, wild onion, violet leaf, lettuce, chickweed, multi-flora rose, and ground ivy! We dressed it with a little salt, pepper, elderberry syrup, and organic sunflower oil. Yum! 


Our Kids Cooking classes are an incredible opportunity for kids and adults alike to learn new kitchen skills, taste new foods, and gain confidence. You might be surprised by how much even very young children can absorb just through observation. One of our regulars surprised us the other day by demonstrating how to properly cut a leaf from its spine without even being prompted! It appears that we have an army of new kitchen gurus on the rise! 


A little helper watches attentively in class 


Our little gourmet garden guru helping our two interns use the salad spinner 


Not everyone is accustomed to eating salad, especially ones with such unusual ingredients, but with Oliver's enthusiasm and charm, we got samples out to our pantry patrons, and many were surprised by how much they enjoyed it!


This young man was wary at first, but was surprised and delighted when he finally decided to taste Oliver's wares. Even after several minutes had passed, he was still marveling at the wonderful taste he held in his mouth!


Sound like fun?


Join us Tuesdays and Thursdays from 4:15-5:00 pm to take part in our next culinary adventure!

See you there!  


Wednesday, June 29, 2016

Smart and Easy Garden Watering with Less Water

Smart and Easy Garden Watering with Less Water


1.     Add Compost and Other Organic Matter to Garden Soil:  Organic matter, such as compost helps soils to absorb water like a sponge, instead of allowing it to all drain away.

2.     Mulch: Mulch is your garden soil’s great friend.  A layer of mulch helps to keep soil from drying out, keeps weeds from sprouting, and breaks down to become organic mater in your garden soil, further increasing your soil’s water retention.  On your annual beds, spread straw or leaves in a 3-4 inch layer over your garden soil, being careful not to cover or crowd your plants. In your perennial beds, use wood chips if you have them.

3.     Water the Soil, Not the Leaves: A drip hose puts the water into the soil, where it needs to go, and keeps plant leaves dry, which helps keep disease under control.  You can place mulch over a drip hose, further conserving water in your garden. Once in place, a drip hose will save you time, and can even be set with an automatic timer, watering without you having to be home!  Instructions to make a drip hose out of a leaky old hose are below.

4.     Water Deeply and Less Often:  Water deeply to fully soak the soil, then wait until it is nearly dry again to water.  This encourages deep roots to grow, which will make the plant more resilient to drought and other stresses. 

5.     Dig Swails: Swails are trenches dug along the curve of a hill to capture water running down the incline.  Dig a 6” deep trench along the downhill side of a garden bed, and fill it in with wood chips to keep water close to your garden plants. 

6.     Limit Weeds:  Weeds drink up water from your soils!

7.     Save Rainwater: Using a rainwater catchment system, you can significantly reduce your municipal water usage. 


Making a drip hose with an old busted hose:
  • Get new life out of an old leaky garden hose by turning it into a drip hose.  Once they are in place, drip hoses help save time and water! 
  • Take your hose and place it over some scrap wood.   Starting where the hose will actually be watering the soil, use a 1/16th drill bit to drill a hole every 2-3”.  
  • Shake out the little bits that were drilled out, and attach hose to spigot.  Flush out the hose with water.  If you won’t be connecting the end of this hose to another, you will need to clamp off the end.  This can be done by cutting off the metal at the end, then folding the end back and securing with some wire or a small clamp. 
  • Place the drip hose on top of the soil as close to the plant roots as you can manage, anchoring the hose with ground pins.  Start by turning the drip hose on for 20 minutes, adjusting the watering time as your garden needs! 


Wednesday, June 22, 2016

Easy as Pie: A Step Toward Healthier Desserts

Here at Mother Hubbard’s Cupboard, we not only provide food assistance to members of the Bloomington community. We actively try to build community with food. By providing whole foods, we offer the idea that people don’t have to settle for processed meals as learning how to make your own meals and maintain your own garden can be free and easy. Simply learning the basics can provide a versatile skill set that can be used in countless ways. This even applies to dessert. Yep, you read that correctly. Every type of meal can be made into a healthy treat simply by paying attention. When you build community with food, you don’t leave dessert out.

Last week, our resident kitchen guru, Kayte, walked us through how to make a perfectly healthy dessert pastry with the accompanying perfect pastry/pie crust. I know what you may be thinking, “A healthy dessert? Perfect pie crust? Get outta town!” Well, ladies and gentleman, before I close up shop and leave Bloomington forever, let me explain. Making your own desserts from scratch can (and will) give you more control over what goes into them. Don’t like your desserts to be overly sweet? Add less sugar. Is it impossible to find the kind of fruit pies you like in the dessert section of Kroger? Obtain your favorite fruit and make it happen; show Kroger that its your pie and you’ll put peaches and rhubarb together if you so please.
           
The point I’m trying to make here is that having more autonomy over your own meals, even desserts, can be extremely beneficial to one’s diet. It can also help to build confidence in one’s self-sufficiency. The task may seem daunting at first, but once you start making your way through you’ll see how easy it can be.

Is that it?" You ask. I say "Trust Me"
Less ingredients than you have fingers. Surprised?
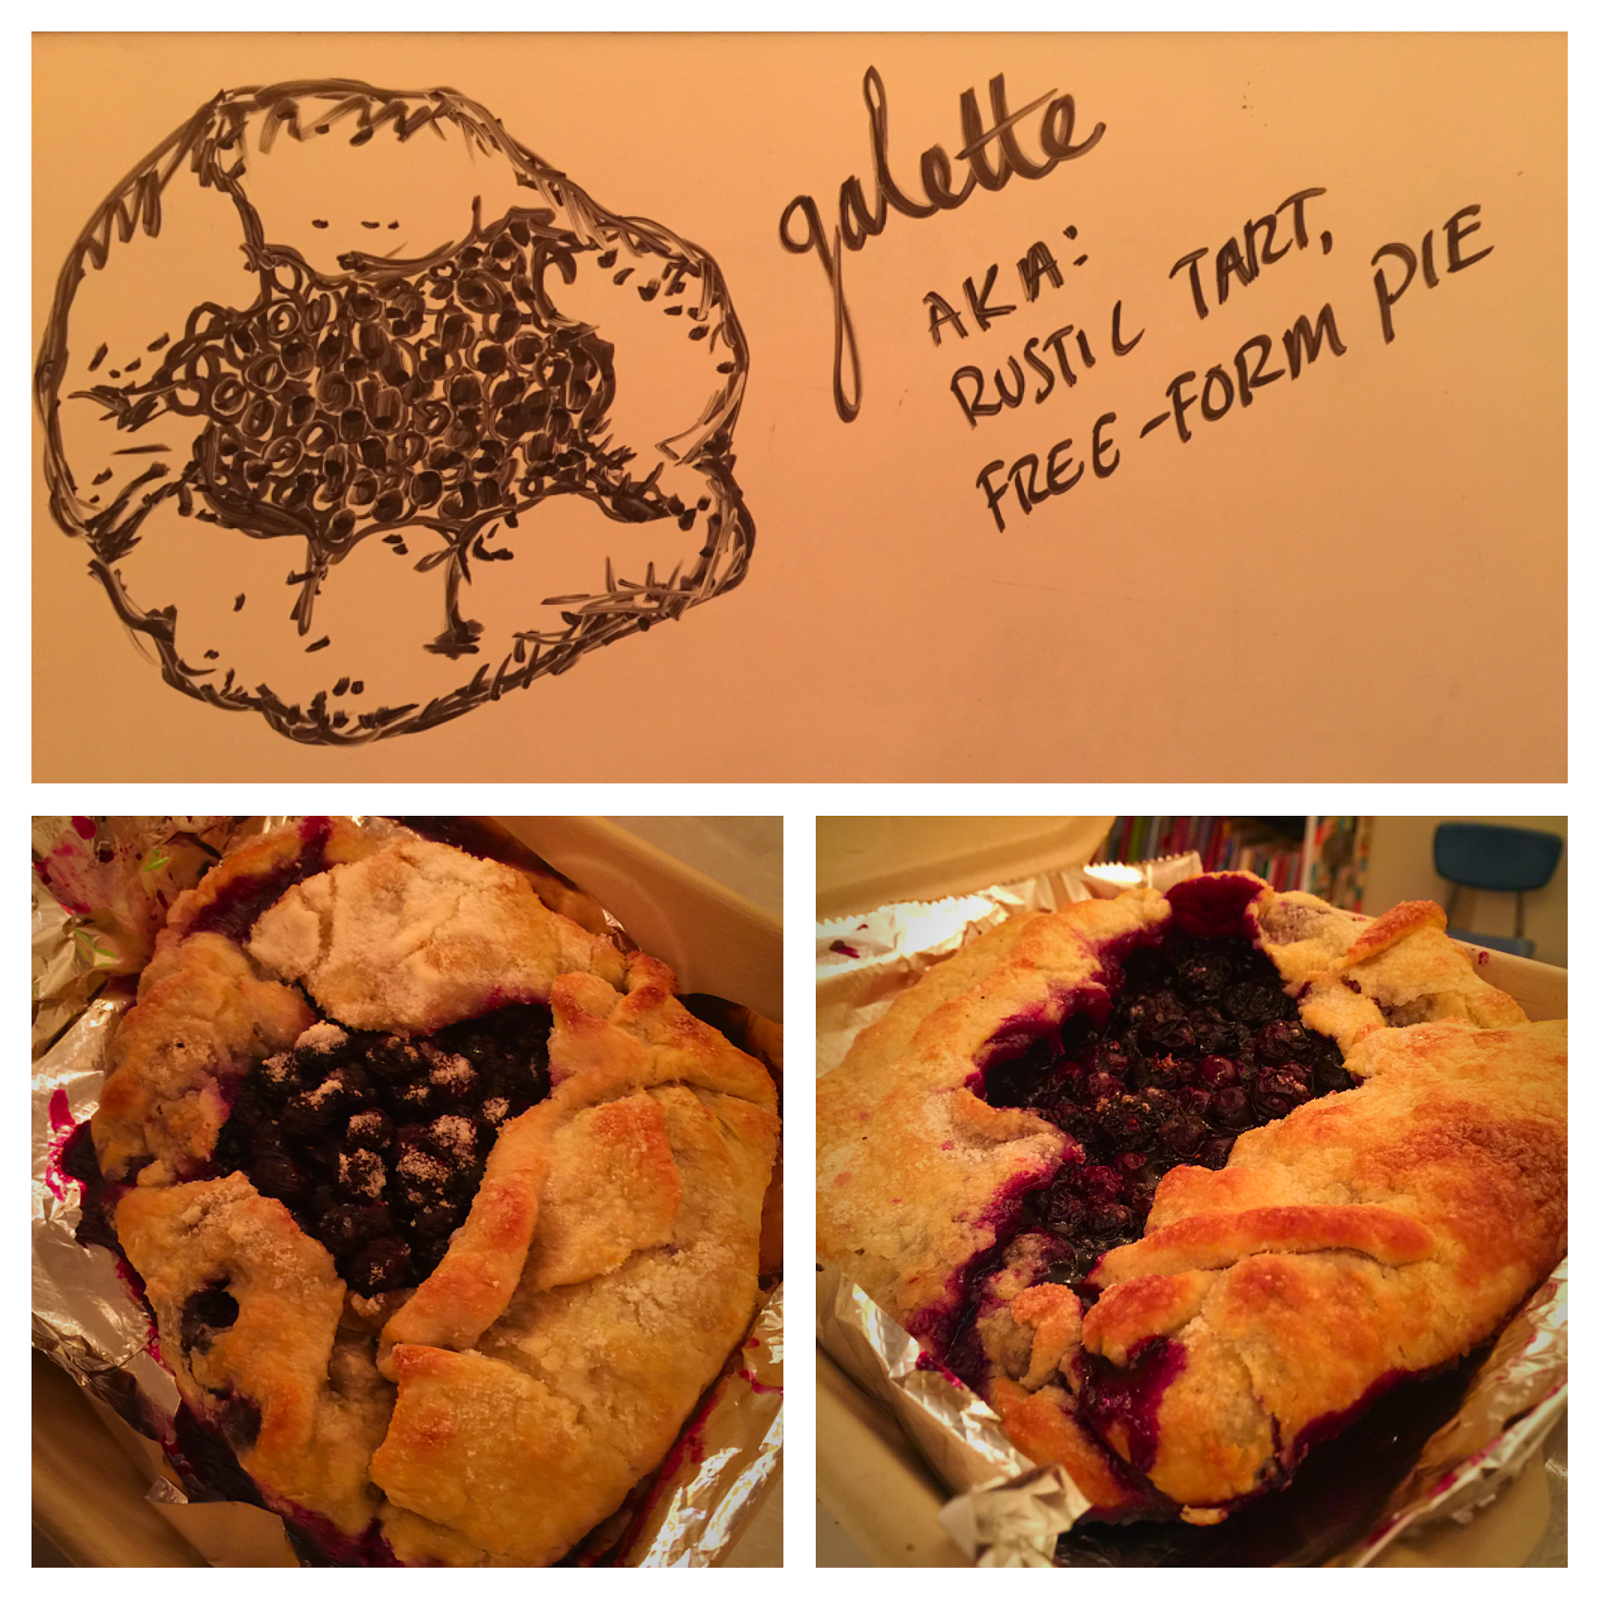
    So, on this day Kayte walked us through a very low maintenance type of pie called a galette which is French for  a rustic free form pie. We used a blueberry filling as it is the easiest to work with but any fruit can be used. In addition to the above ingredients you’ll need a cookie sheet, any size will do really. After reading you will be the proud owner of a tasty treat that should look a little like this:
I can attest that it is as delicious as it looks
Of course it would be great if I was able to accurately transcribe Kayte’s instructions for all you wonderful people but, alas, I am not able to write/type as fast as natural speech progresses (shout-out to all the court reporters in the audience). All is not lost though; I have pictures of every step. The following directions come from another pie post here on our blog, they are very thorough and virtually identical to Kayte’s method.

·      Combine the flour, salt, and sugar in the container of a food processor; pulse once or twice. Add the butter and turn on the machine; process until the butter and flour are blended and the mixture looks like cornmeal, with a few pea-sized chunks (about 10 seconds).

·      Dump the mixture in a bowl and sprinkle 2 tablespoons of water over it. Use a wooden spoon or a rubber spatula to toss and combine, then sprinkle 1more tablespoon of water, and toss to combine. Gradually gather the mixture into a ball; if the mixture seems dry, add another ½ tablespoon ice water. When you can make the mixture into a ball with your hands, do so. Wrap in plastic wrap, flatten into a small disk, and freeze the dough for 10 minutes (or refrigerate for 30 minutes); this will ease rolling.

·      Sprinkle a countertop or large board with flour. Unwrap the dough disk and place it on the work surface; sprinkle its top with flour. If the dough is hard, let it rest for a few minutes; it should give a little when you press your fingers into it.

·      Roll with light pressure, from the center out. (If the dough seems very sticky at first, add flour liberally; but if it becomes sticky only after you roll it for a few minutes, return it to the refrigerator for 10 minutes before proceeding.) Continue to roll, adding small amounts of flour as necessary, rotating the dough occasionally, and turning it over once or twice during the process

·      Finally, move the dough onto whatever medium you’ll be placing in the oven (pie pan for standard pies, wax/parchment paper for galettes, tart pan for (you guessed it) tarts).

Ms. Lindey got creative w/peaches
Standard sugar and berries
Now that your dough is all rolled and placed, you’ll need to stop staring at your magic hands (because yes, they did make the perfect dough) so we can move on to the next step: the filling. This step is incredibly easy, mix together your blueberries and sugar gently in a mixing bowl and *boom* done. Now you may be wondering how long you’ve possessed super speed comparable to “The Flash” and my answer to you is “always.”

So close to being done
 At this point you’ll want to pour your filling onto the rolled out dough and start pulling the edges over the filling, making sure to leave an opening on the very top; this will ensure even baking. After that, brush the top of your dough with butter or cream (to help with browning), sprinkle with sugar and its ready to bake.

Intern Thomas assisting Kam
     Kayte suggested baking on high heat (450 degrees) for about 10 mins and then turn that oven down to about 350 degrees for another 15-20mins. Be sure to keep an eye on it throughout this time, though. No need want to burn the artwork.

Now, theres only a couple things left to say. When you take your pie out of the oven, you may notice a nice amount of blueberry juice that has spilled out. This is perfectly normal so no need to be worried. It just means that some part of the dough was a little thin. Once you give the pastry a little time to cool, you can easily lift the pie off the cookie sheet and onto a clean dessert pan, plate, stand or what have you.


Pre-bake
Post-bake
    So, thats it. You've successfully made a flawless pastry that the whole family can enjoy (or just yourself, no judgment). Now, any time you want a unique dessert that you are tired of searching for you can whip it up at home in less than an hour and a half.  Remember, this recipe is incredibly versatile; you could even fill your crust with a savory blend of vegetables & eggs to make a quiche if you are so inclined. 

We were
Until next time, or as the french say, "Au Revoir!"


Thursday, June 9, 2016

'Tis the Season ... For Fresh Herbal Teas!

It's mid June, and things are in bloom here in Bloomington. Flowers are shining their pretty little faces, the bees are a-buzzing, and the trees have fleshed out their canopies, creating beautiful umbrellas of shade under which one might sit and enjoy a cool glass of lemonade. Or perhaps a fresh herbal tea?

Summer is a great time for herbs, which usually like plenty of sun and well-drained soil, and it's also a great time for refreshing drinks!

Not only are most herbs beautiful to look at, delightful to smell, and delicious to taste; they also carry powerful healing benefits. Though most herbal teas you buy at the store are dried, you can also brew with herbs harvested straight from the garden. 


Try harvesting some of these herbs and plants for your sipping pleasure (and for their marvelous healing properties):
  1. Mint: Leaves; calming, digestive.
  2. Passion Flower: Leaves; relaxing and restful sleep.
  3. Rosehips: Buds after bloom has died; vitamin C boost.
  4. Lemon Balm: Leaves; calming and relaxing.
  5. Chamomile: Buds; relaxing and soothing tummy.
  6. Echinacea: Buds; immune support.
  7. Milk Thistle: Buds; detoxification.
  8. Angelica: Root; digestive support.
  9. Catnip: Leaves; calming.
  10. Raspberry: Leaf; female reproductive support.
  11. Lavender : Buds; calming and soothing.
  12. Nettles: Leaf; detoxifying, nourishing.
  13. Red Clover; Buds; purifying, detoxifying.
  14. Dandelion: Root; liver support; blood tonic.
  15. Linden: Flowers; digestive, calming.
  16. Lemongrass: Stalk; calming, relaxing, digestive aid.
For more tips on harvesting, drying, and brewing your own herbal concoctions, check out our resources page on the blog.


Thanks to Organic Authority for their handy list of herbs and benefits http://www.organicauthority.com/organic-gardening/grow-plants-herbal-tea-garden.html and tp Crafty Cooking Mama for the beautiful image of mint tea http://www.craftycookingmama.com/meadow-tea-pa-dutch-iced-mint-tea/

Wednesday, June 1, 2016

Work Together, Play Together: Celebrating Our First Monthly Dig and Dine!

Fresh fruit salad caps off our delicious spread

At Mother Hubbard's Cupboard, we care about community building! And what better way to do so than getting together and having a good time? Last week we held our first monthly Dig and Dine, and  we had an absolute blast! Community members joined us in the garden for an hour of fun in the soil and sun, followed by a delicious feast out on our back patio.

The party is just getting started!
Staff member, Hannah, shows kids a thing or two about kale
Hub staff and interns took turns in the kitchen all day preparing and, when 5 o'clock rolled around, we were ready to get our hands dirty and work up an appetite. We had helpers young and old, and  together we planted, weeded, prepped and pruned, getting our garden in tip top condition. At 6 o'clock, we headed around back. 
Hub interns enjoying the fruits of their labors
If you're wondering what you missed, a wood sorrel "lemonade" cooled and refreshed our gardener guests and a hearty spread filled their hungry bellies. The flavors of oven-roasted root vegetables with garden-fresh herbs, naan bread still warm from the oven, Mujadara (a Lebanese dish of rice and lentils with cumin and caramelized onions) with a delicious accompaniment of yogurt sauce with cumin, coriander and garlic were in perfect harmony, and a salad of mixed greens and radishes from our Butler garden provided a palate cleansing finish. With a fresh fruit salad for dessert, we all left feeling nourished in our bodies and in our hearts.

One, two, three...so yummy!
One of our little helpers shows off her adorable smile
Hannah struggling to outrun her "Duck duck goose" opponent
Lively conversation in Spanish and English, and the joyous squeals of children playing "Duck, Duck, Goose" sprinkled the evening air. As dinner came to a close, everyone pitched in to pack up leftovers and to tidy up the patio. The evening was productive, nourishing, and just plain fun!

If you want to experience the fun first-hand, come by for our next one, Thursday June 30th at 5 pm!
See you next time!