Showing posts with label pie. Show all posts

Monday, October 23, 2017

Food Day 2017

ejnfef

The Hub is celebrating our annual Food Day celebration, complete with an urban agriculture demo, a canning demo, kid-friendly activities and lots of pie!

Food Day is a national celebration of food, focusing on health and fairer food policies. The idea behind food day is simple: promoting healthier, affordable and ecofriendly food for all Americans. With our country's resources, there's no excuse for underfed or unhealthy populations. Food Day also highlights one of Mother Hubbard's central mantras: food is a basic human right that everyone should have easy access to.

You can take Food Day as an opportunity to change your perspective on food policies, start eating healthy, or begin educating yourself on food justice. Everyone is welcome to join our celebration, so feel free to bring your friends and family too!

We want to celebrate food in all its glory. That's why we're coming together as a community, discussing issues, and enjoying a delicious slice of pie at our Food Day!

Join the event on Facebook.

We're looking forward to seeing you there!

Wednesday, June 22, 2016

Easy as Pie: A Step Toward Healthier Desserts

Here at Mother Hubbard’s Cupboard, we not only provide food assistance to members of the Bloomington community. We actively try to build community with food. By providing whole foods, we offer the idea that people don’t have to settle for processed meals as learning how to make your own meals and maintain your own garden can be free and easy. Simply learning the basics can provide a versatile skill set that can be used in countless ways. This even applies to dessert. Yep, you read that correctly. Every type of meal can be made into a healthy treat simply by paying attention. When you build community with food, you don’t leave dessert out.

Last week, our resident kitchen guru, Kayte, walked us through how to make a perfectly healthy dessert pastry with the accompanying perfect pastry/pie crust. I know what you may be thinking, “A healthy dessert? Perfect pie crust? Get outta town!” Well, ladies and gentleman, before I close up shop and leave Bloomington forever, let me explain. Making your own desserts from scratch can (and will) give you more control over what goes into them. Don’t like your desserts to be overly sweet? Add less sugar. Is it impossible to find the kind of fruit pies you like in the dessert section of Kroger? Obtain your favorite fruit and make it happen; show Kroger that its your pie and you’ll put peaches and rhubarb together if you so please.
           
The point I’m trying to make here is that having more autonomy over your own meals, even desserts, can be extremely beneficial to one’s diet. It can also help to build confidence in one’s self-sufficiency. The task may seem daunting at first, but once you start making your way through you’ll see how easy it can be.

Is that it?" You ask. I say "Trust Me"
Less ingredients than you have fingers. Surprised?
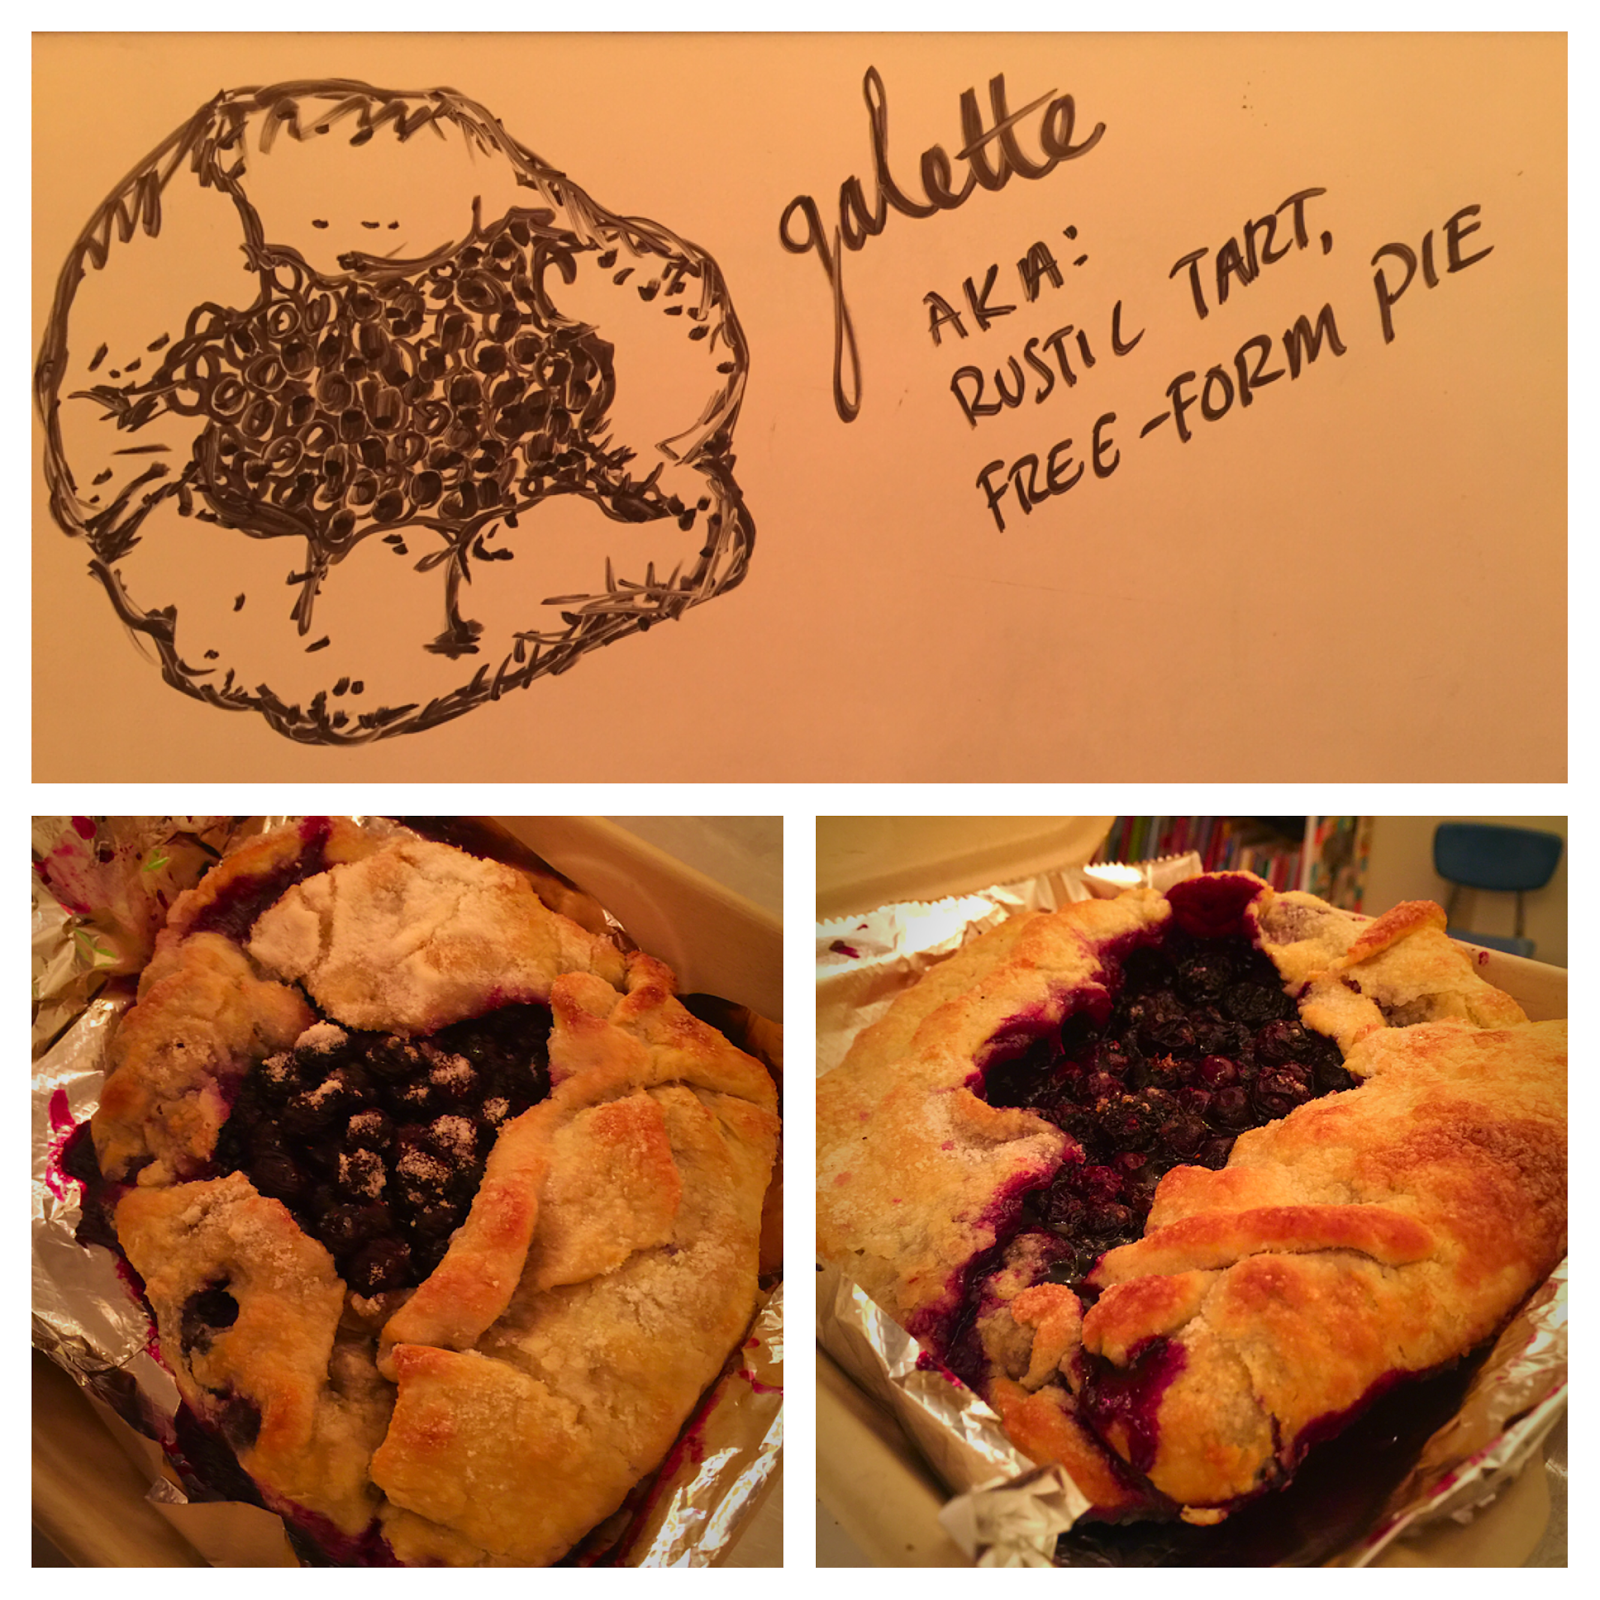
    So, on this day Kayte walked us through a very low maintenance type of pie called a galette which is French for  a rustic free form pie. We used a blueberry filling as it is the easiest to work with but any fruit can be used. In addition to the above ingredients you’ll need a cookie sheet, any size will do really. After reading you will be the proud owner of a tasty treat that should look a little like this:
I can attest that it is as delicious as it looks
Of course it would be great if I was able to accurately transcribe Kayte’s instructions for all you wonderful people but, alas, I am not able to write/type as fast as natural speech progresses (shout-out to all the court reporters in the audience). All is not lost though; I have pictures of every step. The following directions come from another pie post here on our blog, they are very thorough and virtually identical to Kayte’s method.

·      Combine the flour, salt, and sugar in the container of a food processor; pulse once or twice. Add the butter and turn on the machine; process until the butter and flour are blended and the mixture looks like cornmeal, with a few pea-sized chunks (about 10 seconds).

·      Dump the mixture in a bowl and sprinkle 2 tablespoons of water over it. Use a wooden spoon or a rubber spatula to toss and combine, then sprinkle 1more tablespoon of water, and toss to combine. Gradually gather the mixture into a ball; if the mixture seems dry, add another ½ tablespoon ice water. When you can make the mixture into a ball with your hands, do so. Wrap in plastic wrap, flatten into a small disk, and freeze the dough for 10 minutes (or refrigerate for 30 minutes); this will ease rolling.

·      Sprinkle a countertop or large board with flour. Unwrap the dough disk and place it on the work surface; sprinkle its top with flour. If the dough is hard, let it rest for a few minutes; it should give a little when you press your fingers into it.

·      Roll with light pressure, from the center out. (If the dough seems very sticky at first, add flour liberally; but if it becomes sticky only after you roll it for a few minutes, return it to the refrigerator for 10 minutes before proceeding.) Continue to roll, adding small amounts of flour as necessary, rotating the dough occasionally, and turning it over once or twice during the process

·      Finally, move the dough onto whatever medium you’ll be placing in the oven (pie pan for standard pies, wax/parchment paper for galettes, tart pan for (you guessed it) tarts).

Ms. Lindey got creative w/peaches
Standard sugar and berries
Now that your dough is all rolled and placed, you’ll need to stop staring at your magic hands (because yes, they did make the perfect dough) so we can move on to the next step: the filling. This step is incredibly easy, mix together your blueberries and sugar gently in a mixing bowl and *boom* done. Now you may be wondering how long you’ve possessed super speed comparable to “The Flash” and my answer to you is “always.”

So close to being done
 At this point you’ll want to pour your filling onto the rolled out dough and start pulling the edges over the filling, making sure to leave an opening on the very top; this will ensure even baking. After that, brush the top of your dough with butter or cream (to help with browning), sprinkle with sugar and its ready to bake.

Intern Thomas assisting Kam
     Kayte suggested baking on high heat (450 degrees) for about 10 mins and then turn that oven down to about 350 degrees for another 15-20mins. Be sure to keep an eye on it throughout this time, though. No need want to burn the artwork.

Now, theres only a couple things left to say. When you take your pie out of the oven, you may notice a nice amount of blueberry juice that has spilled out. This is perfectly normal so no need to be worried. It just means that some part of the dough was a little thin. Once you give the pastry a little time to cool, you can easily lift the pie off the cookie sheet and onto a clean dessert pan, plate, stand or what have you.


Pre-bake
Post-bake
    So, thats it. You've successfully made a flawless pastry that the whole family can enjoy (or just yourself, no judgment). Now, any time you want a unique dessert that you are tired of searching for you can whip it up at home in less than an hour and a half.  Remember, this recipe is incredibly versatile; you could even fill your crust with a savory blend of vegetables & eggs to make a quiche if you are so inclined. 

We were
Until next time, or as the french say, "Au Revoir!"


Saturday, July 12, 2014

It's Yogurt Time, Folks!

With milk and fruit on sale this week, and free yogurt starter at the HUB (It’s part of the Tool Share program, between 12:30 and 5:30 Monday through Friday, and available to the general public for a small membership fee - more about it soon.) it’s time to make some yogurt! A quart of commercial plain yogurt costs anywhere from $2.00 to $4.00, or more. That same quart of homemade plain yogurt costs just 47 cents if you buy your milk at Kroger this week (through next Wednesday, July 16) for $1.88 a gallon. And those tiny little cups that occasionally go on sale for 39 cents each but are usually more like 50 cents or more? They cost just 7 cents to make!

Don’t like plain yogurt? No problem. Add a cup of blueberries to a quart of plain yogurt for a total cost of just 97 cents for 5 cups of fruit yogurt. Or a cup of chopped peaches for the same total cost of 97 cents. That’s just 15 cents for one of those little 5-ounce cups!

Not only are you saving beaucoup bucks, but you’re getting real fruit and real milk and no preservatives, additives or other things you can’t pronounce!

Check here for our recipes for PLAIN YOGURT, HONEYDEW SMOOTHIE, STRAWBERRY & BLUEBERRY SMOOTHIE DELUXE, or make your own smoothie with your choice of fruit and maybe a little bit of sugar or other sweetener. A few drops of almond extract is good with most berries and stone fruits (peaches, plums, nectarines, apricots, etc.) and so is a light sprinkling of nutmeg. Pour yogurt into a small paper cup and stick a popsicle stick into it for a yogurt ice pop. Pour it into a graham cracker pie crust for a refrigerator pie. (Especially good if you fold in some whipped cream and a bit more sugar!)

Mmm-mmm.! Cool, delicious, cheap and good for you! An unbeatable combination!

Mary Anne

PS - Homemade yogurt is lots cheaper than commercial at just about any milk price. Take a look below and see how much your yogurt will cost at different milk prices.

                               Cost of Homemade Yogurt at Various Milk Prices 
 Price per   Cost per  Cost per  Cost per   5 oz with 
 Gallon of   Quart of  8 oz Cup  5 oz Cup   50 cents 
 Milk   Yogurt  of Yogurt  of Yogurt   fruit/qt. 
       1.88        0.47        0.12        0.07
0.15
       2.00        0.50        0.13        0.08
0.16
       2.25        0.56        0.14        0.09 0.17         
       2.50        0.63        0.16        0.10 0.18         
       2.75        0.69        0.17        0.11
0.19
       3.00        0.75        0.19        0.12 0.20         
1 cup of blueberries this week or 1 cup of chopped peaches  = 50 cents - 7/11/14


Thursday, June 12, 2014

Pocket Full of Greens


Our annual Pie for Dinner workshop focusses on savory pies and related pie-like dishes such as tarts, quiches, fritatas, shepherd's pie and empanadas. One of my favorites in this category is a recipe from Deborah Madison's Vegetarian Cooking for Everyone.

Empanadas with Greens and Olives is a delicious way to pack a whole lot of nutrient-dense greens into a grab-and-go pocket that fits in the palm of your hand. The pastry is a simple pie dough, with paprika mixed in with flour. For added depth of flavor, try smoked paprika. Enjoy!

--Kayte

Sunday, August 11, 2013

Zucchini Pie

(Farm Journal’s Best-Ever Vegetable Recipes, 1984)

6 c sliced, halved, peeled zucchini
1/2 t salt
3/4 c sugar
1/4 c lemon juice
3 T quick-cooking tapioca
3/4 t cinnamon
3/4 allspice
3/4 t vanilla
Pastry for a two crust pie
1 T butter

Preheat oven to 425. (It must be preheated for this recipe.)

Place zucchini in a large saucepan and add salt. Add boiling water to cover. Bring to a boil over high heat. Remove from heat and let stand for 5 minutes. Drain.

Meanwhile, stir sugar, lemon juice, tapioca, cinnamon, allspice and vanilla together in a large bowl. Add drained zucchini and toss until zucchini is well coated.

Line a 9” pie pan with pastry. Spoon in zucchini mixture, then dot with butter. Top with second crust. Flute edge. Cut slits in top crust to allow steam to escape. Bake at 425 for 30 minutes, then reduce heat to 350 and bake another 30 minutes.

Note: A mandoline, which you can borrow from the Hub, would work great to slice the zucchini. A food processor, which you can also borrow from the Hub, would slice it too thin.

Sunday, July 28, 2013

Sparkin' Pie

(New England Cookbook, by Eleanor Early, 1954)

“This particular pie was made by a girl who wished to impress a beau who was sparkin’ her. It turned out so good that he popped the question, and they got married and lived happily ever after.”

3 eggs, beaten
1-1/2 c strained applesauce
½ c sugar
1 t cinnamon or ½ t each of cinnamon and nutmeg or mace
1/3 t salt
1-1/2 c milk


Combine everything, then pour mixture into an unbaked pastry shell. Bake at 450 for 10 minutes, then reduce heat to 350 for about 30 minutes or until a knife inserted in the center of the filling comes out clean.

Wednesday, November 14, 2012

Pumpkin Pie

Pumpkin pie is one of the healthier desserts, since it consists of mostly squash (you can substitute butternut squash, by the way, in almost every recipe calling for pumpkin puree).

Bake the pumpkin ahead of time. Simply cut a small pumpkin in half, place it face down on a cookie sheet, and bake it at 350F, for an hour and 15 minutes, to an hour and a half. Once it has cooled a bit, the peel comes off easily (just scoop it out). Then puree it in the food processor or food mill (you could also use a potato masher or a fork).

I sometimes make the crust the night before, stick it in the fridge, and make the pie in the morning, but either way, you will want to chill the dough for 30 minutes before.
Use the Flaky Pie Crust recipe for the pumpkin pie crust. For this recipe, and other moist, custard-type pies, you can pre-bake the crust to keep it from getting soggy but it is not necessary for this particular filling.

CLASSIC PUMPKIN PIE FILLING  Adapted from Once Upon a Tart by Frank Mentesana and Jerome Audureau

2 large eggs
1 ¾ cup fresh pumpkin puree
1 tablespoon molasses
1 teaspoon grated fresh ginger
½ cup granulated sugar
¼ cup packed brown sugar
1 teaspoon ground cinnamon
¼ teaspoon cloves (optional)
1 12-ounce can (1 ½ cup) evaporated milk
1 par-baked flaky piecrust

Position your oven racks so that one is in the center, and preheat the oven to 375 degrees. Whisk the eggs in a big bowl to break up the yolks. Whisk in the pumpkin, molasses and fresh ginger.  In a separate, medium-sized bowl, whisk the sugars and spices together. Add this to the pumpkin mixture, and whisk some more.  Gradually add the evaporated milk, stirring until the filling is smooth and the milk is fully incorporated into the pumpkin. Pour the pumpkin filling into the par-baked pie shell and bake for 35-40 minutes until the filling is firm to the touch and doesn’t jiggle when you shake the pan. Don’t worry if the top cracks slightly, that happens.  Cool on a wire rack before cutting into it.
Pastry Cookies on Top
If you like, you can make some decorations with pie dough scraps, bake them, and arrange them on top.  Here’s how: Roll out some dough scraps. Use a leaf-shaped cookie cutter (or whatever shape you like) to cut out some shapes. Brush the pastry with some cream, or milk. Sprinkle with sugar, place them on a baking sheet and bake until they are golden brown and crispy. Remove from oven and cool on a wire rack. Just before serving the pie, arrange these “cookies” on top. 


Flaky Pie Crust

Adapted from Mark Bittman's How to Cook Everything. 
For an 8 to 10 inch, two-crust pie. 

1  1/8  cups of all purpose flour, plus some for dusting the work surface.
1/2 teaspoon salt
1 teaspoon sugar
8 Tablespoons cold unsalted butter (2 sticks, cut into 16 pieces)
about 3 Tablespoons ice water, plus more as needed.

Combine the flour, salt, and sugar in the container of a food processor; pulse once or twice. Add the butter and turn on the machine; process until the butter and flour are blended and the mixture looks like cornmeal, with a few pea-sized chunks (about 10 seconds).
Dump the mixture in a bowl and sprinkle 2 tablespoons of water over it. Use a wooden spoon or a rubber spatula to toss and combine, then sprinkle 1more tablespoon of water, and toss to combine. Gradually gather the mixture into a ball; if the mixture seems dry, add another ½ tablespoon ice water. When you can make the mixture into a ball with your hands, do so. Wrap in plastic wrap, flatten into a small disk, and freeze the dough for 10 minutes (or refrigerate for 30 minutes); this will ease rolling. (You can also refrigerate the dough for a day or two, or freeze it for up to 3 months).
You can roll the dough between two sheets of plastic wrap, usually quite successfully; sprinkle both sides of it with a little more flour, then proceed. Or sprinkle a countertop or large board with flour. Unwrap the dough disk and place it on the work surface; sprinkle its top with flour. If the dough is hard, let it rest for a few minutes; it should give a little when you press your fingers into it.
Roll with light pressure, from the center out. (If the dough seems very sticky at first, add flour liberally; but if it becomes sticky only after you roll it for a few minutes, return it to the refrigerator for 10 minutes before proceeding.) Continue to roll, adding small amounts of flour as necessary, rotating the dough occasionally, and turning it over once or twice during the process. (Use ragged edges of dough to repair any tears, adding a drop of water while you press the patch into place.) When the dough is about 10 inches in diameter (it will be less than ¼-inch thick), place your pie plate upside down over it to check the size. Move the dough into the pie plate by draping it over the rolling pin or by folding it into quarters, then moving it into the pan and unfolding it. When the dough is in the pan, press it firmly into the bottom, sides, and junction of bottom and sides. Trim the excess dough to about ½ inch all around. Freeze for 10 minutes (or refrigerate it for 30 minutes).

To par-bake the crust
Preheat oven to 400 degrees F.
Refrigerate pie crust for 30 minutes. When you’re ready to bake, prick it all over with a fork.
Tear off a piece of foil large enough to fit over the entire crust when folded in half. then press it into the crust. Weight the foil with a pile of dried beans or pie weights or a tight fitting skillet or sauce pan--anything that will sit flat on the surface.
Bake 10 minutes on the center rack of your oven. Remove from the oven and carefully remove the weight and foil. Bake another 5 minutes, or until the bed of the pie shell appears dry. Remove from the oven and set it on a wire rack to cool.