Wednesday, June 22, 2016

Easy as Pie: A Step Toward Healthier Desserts

Here at Mother Hubbard’s Cupboard, we not only provide food assistance to members of the Bloomington community. We actively try to build community with food. By providing whole foods, we offer the idea that people don’t have to settle for processed meals as learning how to make your own meals and maintain your own garden can be free and easy. Simply learning the basics can provide a versatile skill set that can be used in countless ways. This even applies to dessert. Yep, you read that correctly. Every type of meal can be made into a healthy treat simply by paying attention. When you build community with food, you don’t leave dessert out.

Last week, our resident kitchen guru, Kayte, walked us through how to make a perfectly healthy dessert pastry with the accompanying perfect pastry/pie crust. I know what you may be thinking, “A healthy dessert? Perfect pie crust? Get outta town!” Well, ladies and gentleman, before I close up shop and leave Bloomington forever, let me explain. Making your own desserts from scratch can (and will) give you more control over what goes into them. Don’t like your desserts to be overly sweet? Add less sugar. Is it impossible to find the kind of fruit pies you like in the dessert section of Kroger? Obtain your favorite fruit and make it happen; show Kroger that its your pie and you’ll put peaches and rhubarb together if you so please.
           
The point I’m trying to make here is that having more autonomy over your own meals, even desserts, can be extremely beneficial to one’s diet. It can also help to build confidence in one’s self-sufficiency. The task may seem daunting at first, but once you start making your way through you’ll see how easy it can be.

Is that it?" You ask. I say "Trust Me"
Less ingredients than you have fingers. Surprised?
    So, on this day Kayte walked us through a very low maintenance type of pie called a galette which is French for  a rustic free form pie. We used a blueberry filling as it is the easiest to work with but any fruit can be used. In addition to the above ingredients you’ll need a cookie sheet, any size will do really. After reading you will be the proud owner of a tasty treat that should look a little like this:
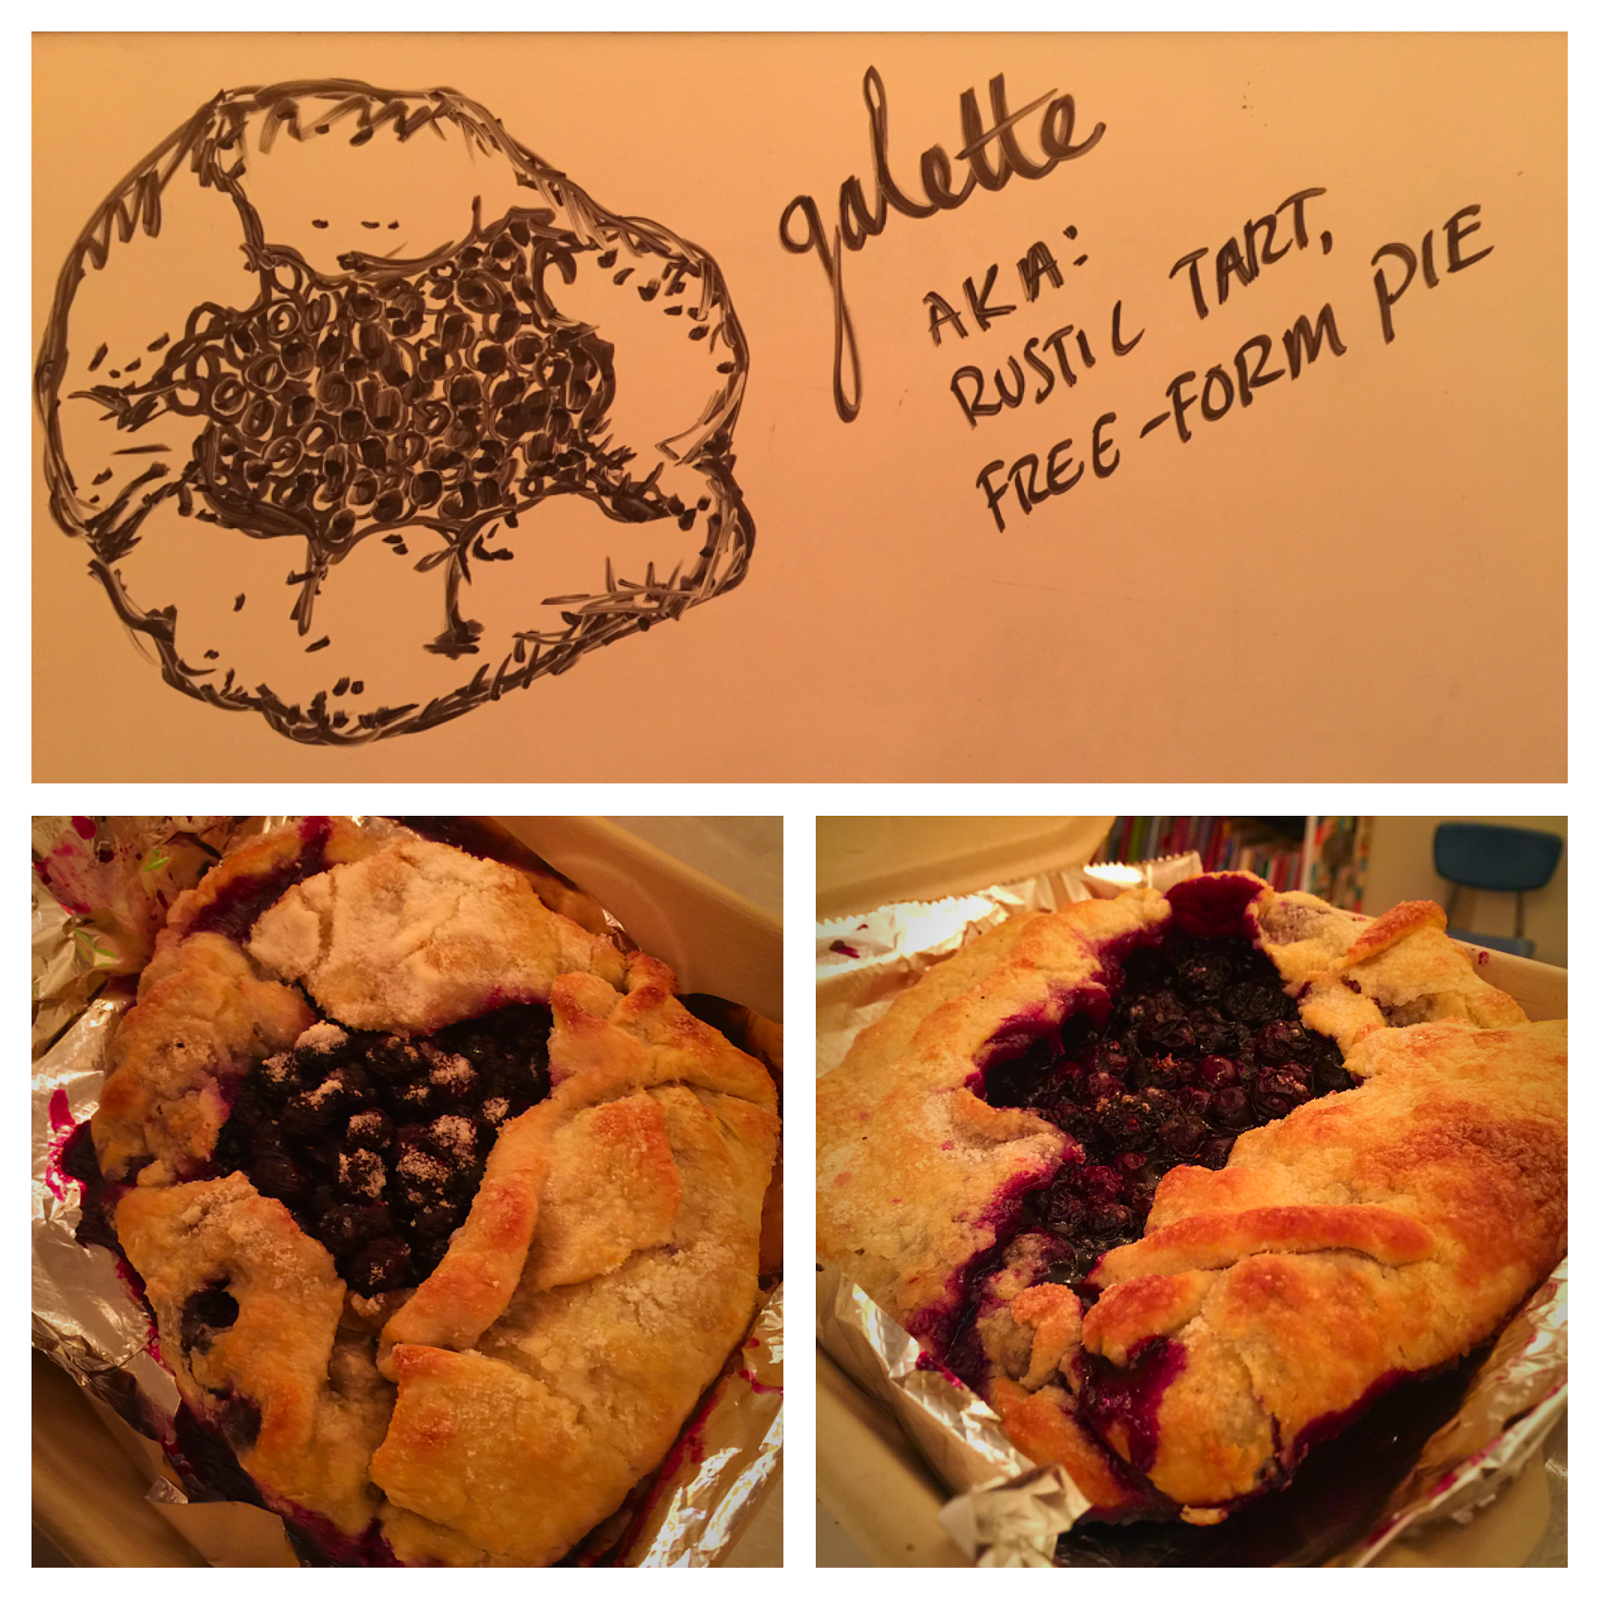
I can attest that it is as delicious as it looks
Of course it would be great if I was able to accurately transcribe Kayte’s instructions for all you wonderful people but, alas, I am not able to write/type as fast as natural speech progresses (shout-out to all the court reporters in the audience). All is not lost though; I have pictures of every step. The following directions come from another pie post here on our blog, they are very thorough and virtually identical to Kayte’s method.

·      Combine the flour, salt, and sugar in the container of a food processor; pulse once or twice. Add the butter and turn on the machine; process until the butter and flour are blended and the mixture looks like cornmeal, with a few pea-sized chunks (about 10 seconds).

·      Dump the mixture in a bowl and sprinkle 2 tablespoons of water over it. Use a wooden spoon or a rubber spatula to toss and combine, then sprinkle 1more tablespoon of water, and toss to combine. Gradually gather the mixture into a ball; if the mixture seems dry, add another ½ tablespoon ice water. When you can make the mixture into a ball with your hands, do so. Wrap in plastic wrap, flatten into a small disk, and freeze the dough for 10 minutes (or refrigerate for 30 minutes); this will ease rolling.

·      Sprinkle a countertop or large board with flour. Unwrap the dough disk and place it on the work surface; sprinkle its top with flour. If the dough is hard, let it rest for a few minutes; it should give a little when you press your fingers into it.

·      Roll with light pressure, from the center out. (If the dough seems very sticky at first, add flour liberally; but if it becomes sticky only after you roll it for a few minutes, return it to the refrigerator for 10 minutes before proceeding.) Continue to roll, adding small amounts of flour as necessary, rotating the dough occasionally, and turning it over once or twice during the process

·      Finally, move the dough onto whatever medium you’ll be placing in the oven (pie pan for standard pies, wax/parchment paper for galettes, tart pan for (you guessed it) tarts).

Ms. Lindey got creative w/peaches
Standard sugar and berries
Now that your dough is all rolled and placed, you’ll need to stop staring at your magic hands (because yes, they did make the perfect dough) so we can move on to the next step: the filling. This step is incredibly easy, mix together your blueberries and sugar gently in a mixing bowl and *boom* done. Now you may be wondering how long you’ve possessed super speed comparable to “The Flash” and my answer to you is “always.”

So close to being done
 At this point you’ll want to pour your filling onto the rolled out dough and start pulling the edges over the filling, making sure to leave an opening on the very top; this will ensure even baking. After that, brush the top of your dough with butter or cream (to help with browning), sprinkle with sugar and its ready to bake.

Intern Thomas assisting Kam
     Kayte suggested baking on high heat (450 degrees) for about 10 mins and then turn that oven down to about 350 degrees for another 15-20mins. Be sure to keep an eye on it throughout this time, though. No need want to burn the artwork.

Now, theres only a couple things left to say. When you take your pie out of the oven, you may notice a nice amount of blueberry juice that has spilled out. This is perfectly normal so no need to be worried. It just means that some part of the dough was a little thin. Once you give the pastry a little time to cool, you can easily lift the pie off the cookie sheet and onto a clean dessert pan, plate, stand or what have you.


Pre-bake
Post-bake
    So, thats it. You've successfully made a flawless pastry that the whole family can enjoy (or just yourself, no judgment). Now, any time you want a unique dessert that you are tired of searching for you can whip it up at home in less than an hour and a half.  Remember, this recipe is incredibly versatile; you could even fill your crust with a savory blend of vegetables & eggs to make a quiche if you are so inclined. 

We were
Until next time, or as the french say, "Au Revoir!"


Thursday, June 9, 2016

'Tis the Season ... For Fresh Herbal Teas!

It's mid June, and things are in bloom here in Bloomington. Flowers are shining their pretty little faces, the bees are a-buzzing, and the trees have fleshed out their canopies, creating beautiful umbrellas of shade under which one might sit and enjoy a cool glass of lemonade. Or perhaps a fresh herbal tea?

Summer is a great time for herbs, which usually like plenty of sun and well-drained soil, and it's also a great time for refreshing drinks!

Not only are most herbs beautiful to look at, delightful to smell, and delicious to taste; they also carry powerful healing benefits. Though most herbal teas you buy at the store are dried, you can also brew with herbs harvested straight from the garden. 


Try harvesting some of these herbs and plants for your sipping pleasure (and for their marvelous healing properties):
  1. Mint: Leaves; calming, digestive.
  2. Passion Flower: Leaves; relaxing and restful sleep.
  3. Rosehips: Buds after bloom has died; vitamin C boost.
  4. Lemon Balm: Leaves; calming and relaxing.
  5. Chamomile: Buds; relaxing and soothing tummy.
  6. Echinacea: Buds; immune support.
  7. Milk Thistle: Buds; detoxification.
  8. Angelica: Root; digestive support.
  9. Catnip: Leaves; calming.
  10. Raspberry: Leaf; female reproductive support.
  11. Lavender : Buds; calming and soothing.
  12. Nettles: Leaf; detoxifying, nourishing.
  13. Red Clover; Buds; purifying, detoxifying.
  14. Dandelion: Root; liver support; blood tonic.
  15. Linden: Flowers; digestive, calming.
  16. Lemongrass: Stalk; calming, relaxing, digestive aid.
For more tips on harvesting, drying, and brewing your own herbal concoctions, check out our resources page on the blog.


Thanks to Organic Authority for their handy list of herbs and benefits http://www.organicauthority.com/organic-gardening/grow-plants-herbal-tea-garden.html and tp Crafty Cooking Mama for the beautiful image of mint tea http://www.craftycookingmama.com/meadow-tea-pa-dutch-iced-mint-tea/

Wednesday, June 1, 2016

Work Together, Play Together: Celebrating Our First Monthly Dig and Dine!

Fresh fruit salad caps off our delicious spread

At Mother Hubbard's Cupboard, we care about community building! And what better way to do so than getting together and having a good time? Last week we held our first monthly Dig and Dine, and  we had an absolute blast! Community members joined us in the garden for an hour of fun in the soil and sun, followed by a delicious feast out on our back patio.

The party is just getting started!
Staff member, Hannah, shows kids a thing or two about kale
Hub staff and interns took turns in the kitchen all day preparing and, when 5 o'clock rolled around, we were ready to get our hands dirty and work up an appetite. We had helpers young and old, and  together we planted, weeded, prepped and pruned, getting our garden in tip top condition. At 6 o'clock, we headed around back. 
Hub interns enjoying the fruits of their labors
If you're wondering what you missed, a wood sorrel "lemonade" cooled and refreshed our gardener guests and a hearty spread filled their hungry bellies. The flavors of oven-roasted root vegetables with garden-fresh herbs, naan bread still warm from the oven, Mujadara (a Lebanese dish of rice and lentils with cumin and caramelized onions) with a delicious accompaniment of yogurt sauce with cumin, coriander and garlic were in perfect harmony, and a salad of mixed greens and radishes from our Butler garden provided a palate cleansing finish. With a fresh fruit salad for dessert, we all left feeling nourished in our bodies and in our hearts.

One, two, three...so yummy!
One of our little helpers shows off her adorable smile
Hannah struggling to outrun her "Duck duck goose" opponent
Lively conversation in Spanish and English, and the joyous squeals of children playing "Duck, Duck, Goose" sprinkled the evening air. As dinner came to a close, everyone pitched in to pack up leftovers and to tidy up the patio. The evening was productive, nourishing, and just plain fun!

If you want to experience the fun first-hand, come by for our next one, Thursday June 30th at 5 pm!
See you next time! 

Thursday, May 19, 2016

No Yard? No Soil? No Problem: A Straw Bale Gardening Primer

Not every gardener has a lawn. When short on fertile soil, we have to get creative, and some simple straw bales can transform even a cement parking lot into a verdant paradise! In addition to providing a medium in which your plants can grow, straw bales create an instant raised bed at a convenient height for most people! Even if you do have a yard in which you could plant a more conventional garden, straw bales eliminate the need for kneeling or crouching down to tend to your plants and are also wheelchair accessible.


Are you intrigued?
  Let's give it a try!

What you need: 

Straw bale
Small amount of potting soil
Organic fertilizer or compost
Starts or seeds

Pick a nice sunny spot: 
Once the bales get wet, they will become much heavier and harder to move, so make sure it's where they're going to stay. (If you choose a grassy area, be sure to place several layers of newspaper or a piece of cardboard beneath to prevent grass and weeds from growing up into the bale.)

Position the bale:

Turn the bale with the narrow side up, so the strings holding the bale together are now on the sides (you don't want those strings to be on top in case you were to sever one while planting). On one narrow side, the straw will be folded over, and on the other side it will be cut. Make sure the cut side is up, as the hollow straws will allow moisture to penetrate better.

Condition the bale:
It is important to condition the bale before you plant. This process usually takes between 10 and 14 days. For the first three (3) days, simply water the bale thoroughly so that it remains damp. For the next six (6) days, in addition to watering it, use a liquid fertilizer to add nitrogen to speed up the decomposition. Simply add a capful to a gallon of water and pour it all on the bale. (Another option is to sprinkle a cupful of ammonium sulfate on the top of the bale on days 4-6 and then a half a cup days 7-9, each time watering the fertilizer in deeply.)

On day ten (10), return to simply watering the bale, and continue doing that until the temperature inside the bale starts to reflect the temperature outside. Use a compost or meat thermometer to keep tabs: you'll see the temperature start to rise after the first day or two, spike about mid-way through the process, then start to come back down. Once it reaches a consistent temperature that matches the temperature outside, the bale is ready to be planted.

Choose your plants:
You can grow just about anything in the bale that you can in the ground - with a few exceptions:
Tall plants like indeterminate tomatoes and corn, for example, get too tall and heavy, and can start to break the bale apart. (If you wish to grow tomatoes, stick to bush or other determinate varieties.)

Running plants like sweet potatoes can be harder to grow in a bale too.

We recommend smaller plants like herbs or flowers, or use it for your cooler weather leafy crops. Whichever plants you use, space them the same as you would in the ground.


Plant the bale:
Remove straw to form a hole that is as deep as the rootball of your plant. (Though if you are planting a tomato, you'll want to go deeper.) Place the plant in the hole, add some potting soil around it for extra nutrients and stability, then fill the rest of the hole in with some of the straw you removed and water deeply.

Water and fertilize regularly:
Your plants will receive less nutrition from the bale than it would from the soil, so it's important to fertilize them every week or two. You'll also want to make sure not to let the bale dry out.


And Voilá! 

You can create your garden from as many straw bales as you'd like, arranged to fit 
your need, aesthetic, or mood! 


Happy Growing!


images, in order of appearance, from:

https://www.fix.com/blog/straw-bale-gardening/
http://blog.quartoknows.com/quartohomes/2015/03/13/one-straw-bale-at-a-time/
http://www.messagemedia.co/millelacs/outdoors/home_garden/end-reward-for-straw-bale-garden-black-gold/article_fc5bfa0a-daa6-11e3-b1cb-0017a43b2370.html

Tuesday, May 10, 2016

Gardening For Health and Wellness

Macintosh HD:Users:kendrabrewer:Dropbox:Garden Program:Watercolor Veggies:wreath.jpegGardening For Health and Wellness

We all love fresh produce from the garden, but did you know that gardening also produces a whole host of health benefits for our minds and bodies.  These benefits can ultimately reduce the cost of our health care!

Gardening can improve your mental and physical health!

* In studies, gardening is shown to significantly help to reduce stress, depression, physical pain, and improve sleep. Simply viewing plant-life reduces peoples stress and boosts recovery times from illness. But working to grow plants, and getting to touch, smell, taste and feel them on a weekly basis creates a raft of positive effects in our brains and bodies.

* Even just touching soil can boost our health! The microbes present in healthy soil are the same microbes that our bodies need to function completely. In today’s world, many of us don’t get enough exposure to these little helpers on a regular basis. But when we garden, we encounter them. Studies demonstrate how this probiotic effect can increase our mood through serotonin creation, and has been likened to a natural anti-depressant!

* Growing food is empowering.  Gardening requires care, attention and responsibility. Gardening stimulates creativity and brings a sense of accomplishment.

* Gardening is a superstar strategy to manage weight, providing both exercise and healthy produce! Getting enough fresh produce and exercise is also important to prevent cancer and heart disease, and decreases risk for many other chronic diseases.

* Gardening is a great mild exercise that can help increase joint flexibility, fine motor skills, and even burns calories. Gardening movements can also build strength and endurance, to aid physical rehabilitation, and helps to stave off osteoporosis.


And the benefits last…many of these studies show that these effects tend to last, even months after the last gardening activity was done!

Community Gardening has even more benefits!

Community gardening provides a great opportunity for social connection, which is a key factor in our happiness and health: Our social connectedness actually influences our blood pressure, immune responses, our stress levels and our rates of chronic illness.  Community gardeners are also more likely to eat more vegetables even than home gardeners. Most of all, community gardening is FUN…Come garden with the Hub!

We are looking to host a Gardening For Therapy Club.  If you are interested in participating, please contact Kendra 

Thursday, April 7, 2016

Wild Edibles Become Spring Treats for Kids


Early Spring is a great time for harvesting wild edibles. Most of the plants haven't flowered yet, so the flavor and nutrient content is at the peak of perfection! In a recent session of Kids Cook at the Hub, we went to the garden to check out the wild chickweed popping up on paths and in containers. Together we examined the plants for identifying details (fuzzy stem, symmetrical leave pattern, watery, lettuce-like leaves) then harvested a basketful for pesto making in the kitchen.

The Hub just offered our annual Spring Wild Edibles Workshop, but look for another workshop in September to learn more about what you can snack on in your own yard.

Monday, February 1, 2016

Sourdough Bread Making: four ingredients for delicious bread

Flour, water, salt and sourdough starter--that's all you need to make delicious bread, once you have a sourdough starter going. Starters are made with flour and water, plus wild yeast. The science behind wild yeast, and the making of a starter is a larger discussion, better explored elsewhere, but making your own delicious, affordable sourdough bread at home is relatively simple. We explored the process this winter in our annual bread baking workshop with Alex Chambers. We walked through all the steps and everyone had a chance to shape and bake some bread to take home. We also sent everyone home with sourdough starters.


What follows are instructions for a great tasting bread made with “wild” yeast. There is no commercial yeast added. It is not hard to keep the sourdough starter alive, and you only need to store a small amount of starter in between baking sessions. There are several steps, and lots of resting and rising time, but the times are flexible and most of it is unattended.  It is not difficult to get into a routine of making sourdough.

No-Knead Sourdough (makes 2 loaves)

Step one: activate the Starter
2 tablespoons flour
1 tablespoon water
1 tablespoon of sourdough starter (kept in the fridge when not in use.)
Mix these three together and let it sit out for 3-6 hours*.

Step two:  Make the Leaven
1 cup flour
½ cup water
The Activated  Starter that you mixed and let sit for 3-6 hours
Mix these together and let it sit for another 3-6 hours*.

Step three: Save Starter for next time.
Take out 1 tablespoon of this mixture and put it in the fridge as a Starter for next time.

Step four: Make the Dough
6 cups flour (I use mostly whole wheat, ideally a finer grind than stoneground. I recommend experimenting with various proportions of whole wheat, white, rye, and anything else you think of.)
2½ teaspoons salt
2-3 cups water
The Leaven that you mixed and let sit out for 4-8 hours.

Mix the dry flour and salt. Add some of the water to the leaven and mix it, adding more of the water, until it becomes soupy. (Sometimes this requires squeezing it through your fingers, since the developed gluten has trouble absorbing water.) Mix the soupy leaven and the rest of the water into the dry ingredients. Add enough water to mix it all into a “shaggy mass” – a pretty wet dough.
Let it sit for 4-8 hours, until it has visibly grown and become airy and tender to the touch.*

Step five: Shaping and Proofing
Using just enough flour to keep dough from sticking to work surface or to your fingers, gently and quickly shape dough into a ball. Generously coat a cotton towel (not terry cloth) with flour, wheat bran or cornmeal; put dough seam side down on towel and dust with more flour, bran or cornmeal. Cover with another cotton towel or saran wrap and let rise for about 30-45 minutes. When it is ready, dough will be more than double in size and will not readily spring back when poked with a finger.

Step six: Bake using one of the two methods below:
Covered Pot (dutch oven) Method (if you have a pot that will work, this method gives the bread great oven spring and a wonderfully crunchy crust)
At least a half-hour before dough is finished proofing, heat oven to 450 500 degrees. Put a 6- to 8-quart heavy covered pot (cast iron, enamel, Pyrex or ceramic) in oven as it heats. When dough is ready, carefully remove pot from oven. Slide your hand under towel and turn dough over into pot, seam side up; it may look like a mess, but that is O.K. Shake pan once or twice if dough is unevenly distributed; it will straighten out as it bakes. Cover with lid,
Turn oven down to 450  place in oven, and and bake 30 minutes, then remove lid and bake another 15 to 30 minutes, until loaf is beautifully browned. Cool on a rack.
Steamy Oven Method (if you don’t have a pot to use, or want to bake more than one loaf at a time, use this method) Preheat the oven to 525 (or as hot as your oven goes), and pour 1 cup hot water onto a tray underneath the baking tray right after putting the loaves in the oven. After about 3 minutes I turn the temperature down to 450 and bake about 30-40 minutes, until the loaves are golden-brown and give a good hollow thump when I tap the bottom.
If you don’t trust your thumb and ears to determine when the thump is good and hollow, you can check the loaf’s doneness with a kitchen probe thermometer/meat thermometer. For a lean loaf like this one, the temperature in the center should be about 195-205°.

*depending on the temperature of the room. Note that any of these steps can be slowed down further by refrigerating.


Tuesday, December 22, 2015

Fresh, Local Produce in our Food Pantry--Even in Winter!

Thanks to The Healthful Food For All Fund, Mondays are looking good in the Hub Food Pantry. Our produce table is piled high with the freshest most beautiful food available anywhere! This week featured Cauliflower (in three colors!) oak leaf lettuce, diakon radishes, winter carrots (the sweetest kind!) turnips, kale, cress, scallions, spinach, apples and more.


The Healthful Food For All Fund (HFFAF) is a program that pays farmers half price for remaining produce that they wish to sell at the end of the winter farmers' market each Saturday, then donates that food to Mother Hubbard's Cupboard and other area non-profits. It is a win-win situation, if there ever was one; farmers don't take as big of a hit for food they didn't sell at market, and Bloomington families experiencing food insecurity get high quality produce during the winter months when fresh food is scarce.


HFFAF is run by a committee of the Bloomington Winter Farmers' Market, and is affiliated with The Center for Sustainable Living. This year, with a generous $10, 000 matching grant challenge from a private family foundation, the program has more funding available than ever before. More farmers are participating as well, and they also obtain fresh greens from Growing opportunities, a hydroponic greenhouse program run by The South Central Community Action Program (SCCAP).

To learn more about the program, or to make a donation, stop by the info table at the Winter Farmers' Market, or contact healthfulfoodfund at gmail dot com.

Thursday, November 12, 2015

Coffee Talk with the Hub


The Hub’s first week of Coffee Talk focused on the upcoming Republican and Democratic debates. Although we are still a year out from the general election we are already being inundated with an unseemly amount of political attacks and a barrage of calculated positions that lead many feeling jaded with the system as a whole, actively trying to find ways to avoid any mention of Republicans, Democrats, or debates. 

But we also know that there will not be a more opportune time to get involved in the discussion that surrounds the injustices that many in our community face on a daily basis. Even though the topics we discussed often strayed away from those directly involving the food security, these issues are all intimately connected, and it is difficult, if not impossible, to wholly address one issue without making note of another.

We asked folks participating in Coffee Talk to submit a question that they would want the Presidential candidates to address, and we got a wide variety of responses:

-How do you plan to boost the economy without sacrificing the environment, local communities, local food systems, and the poorest citizens?
-What are you going to do to stimulate the economy?
-What qualifies you to be the next President of the United States?
-How would you provide health insurance if you repeal Obamacare?
-How do you plan to address the income inequality plaguing the middle class? How will you help those stuck in poverty?
-The student loan crisis is quickly becoming one of the biggest threats to the younger generations’ futures. Do you have a plan to help alleviate the financial pressure today’s students are under?
-What candidate is, in your opinion, best suited to deal with problems that future generations will face (aside from yourself)?
-What is your affiliation with Agribusiness?
-What are you going to do to help the vets?
-How will you address the Farm Bill in terms of loss of American jobs and the rise of health issues, especially childhood obesity and diabetes?
-If elected President, what would your stance be on childhood nutrition and offering healthy foods in schools? Would you want to expand nutrition standards or loosen them?

Perhaps most important was the personal context that was given to many of the issues mentioned above; hearing the stories of some of our patrons gave us insight into the distressing amount of difficulties faced when experiencing food insecurity, and it made these oftentimes incomprehensible issues relatable on a personal level. It became possible to begin drawing connections between the healthcare system, agricultural subsidies, nutrition, student loans, and veterans’ issues that we have to deal with every day.  We look forward to more conversations over coffee and muffins, and to identifying actions we can take to address injustice.